Virtual machines (VMs) can be handy for all sorts of reasons; for example, I may need a machine running Windows 7 to support legacy development tools. I can create a VM running Windows 7 on my host machine that’s running Windows 10. Windows 10 comes with Hyper-V (similar to VirtualBox and other virtualization environments) which lets you do this quickly and easily.
However for embedded development, the virtual machine needs to be able to talk to the target and unfortunately, Hyper-V doesn’t directly support mapping virtual COM ports on the VM to physical COM ports on the host machine. Fortunately, Tim Howard wrote a nifty open source utility: COMpipe that lets you do this pretty easily.
To use it, in Hyper-V Manager, select your VM, choose Settings, choose COM1, then named pipe and give the pipe a name (e.g. wm3com10).
Then launch COMpipe on the host machine in a Command window (needs to have administrator privilege), specifying the physical COM port and the named pipe. For example:
At that point, you should be able to open COM1 in your VM using your favorite serial terminal software (TeraTerm, PuTTY, whatever) and communicate with the device that’s actually connected to COM10 on your host machine. Thanks Tim!!!
When I develop an embedded system, one of the first things I implement is a command-line interface (CLI) which is invaluable for unit testing. It doesn’t take a lot of code to make a fairly sophisticated interface that allows you to type commands and get responses just like a unix or windows/dos command shell.
When I am developing in EmBitz (my favorite microcontroller IDE), for STM32 microcontrollers (my favorite microcontrollers), I use an STLinkV2 (or clone) to allow me to load software into the target and debug it easily. EmBitz provides a wonderful additional feature called EBMonitor that hooks _write() and allows you to redirect standard input and standard output (e.g. printf) over the STLinkV2 and display it in a console window within the development environment. This means you don’t need a serial connection to your target to access the console. See my previous post for more information on using EBMonitor.
However, you often want the CLI to be available for non-developers (e.g. users) using a serial connection via a USB-to-TTL dongle or a USB-to-TTL serial converter built into your target such as the CH340G or HT42B534 into the target. Creating a serial UART console is easy too; you just need to implement your own _read() and _write() functions that usually look something like this:
#ifndef USE_EBMONITOR

// Function called by stdio to send output to stdout
int _write( int fd, char* buf, int len )
{
    int i;
    for(i=0; i<len; i++) {
        uart_putchar(buf[i]);
    }
    return i ;
}

// Function called by stdio to read data from stdin
int _read(int const fd, char* buf, unsigned buf_size)
{
    int nRead = 0;
    do {
        int ch = uart_get_char();
        if ((ch != EOF) && buf) {
           buf[nRead++] = ch;
        }
    } while ((ch != EOF) && (nRead < buf_size));
    return nRead ? nRead : EOF;

}
#endif
and uart_getchar() and uart_putchar() are functions that read/write a character from/to the UART…trivial for polled output or a little more complicated if you want it interrupt-driven (which you do). Once you’ve written this, then you can just #include <stdio.h> in your other modules and use printf() for formatted I/O.
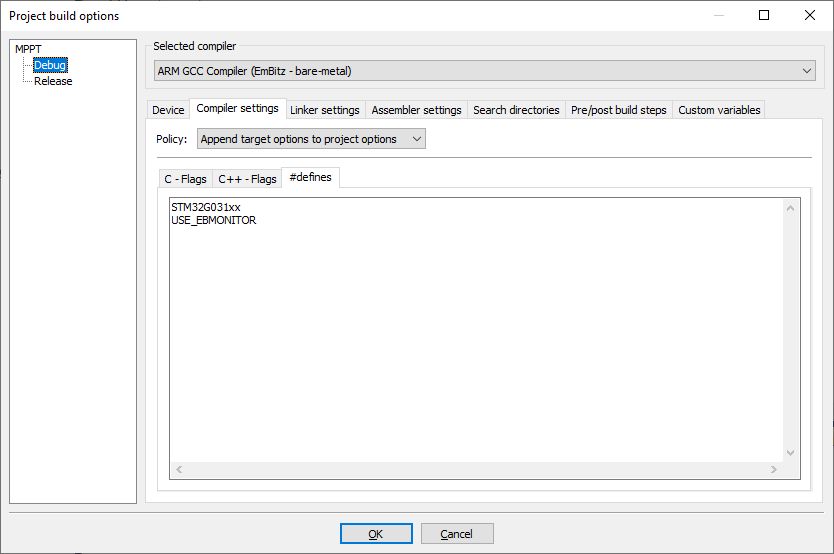
Notice the use of the #ifndef USE_EBMONITOR to wrap _write(). I do this so I can use EBMonitor for debug builds and UART for release builds. EmBitz supports two targets by default: Debug and Release. For the Debug target, I define USE_EBMONITOR under: Project -> Build Options -> Compiler Settings -> #defines
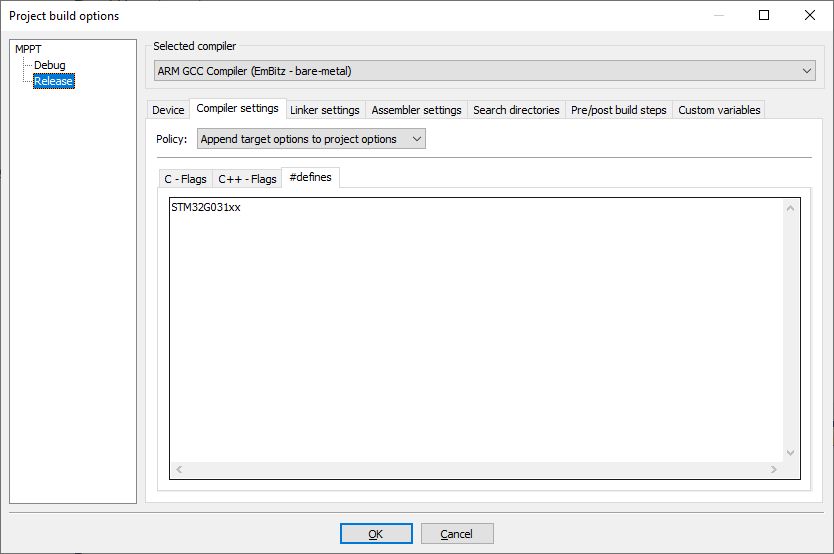
For the Release target I don’t define EBMONITOR:
Writing interrupt driven UART code is beyond the scope of this post, but there are loads of examples and tutorials online. When implementing a CLI you’ll probably want to do some processing of characters as they are received in the ISR. Typically, you’ll store them in a command buffer and then set a flag (e.g. cmd_ready) when a carriage return is received to indicate that there is a command ready to be processed (don’t process commands in interrupt time; just poll the flag in your main loop and clear it after processing the command).
I usually have a command interpreter module that creates a linked-list of commands and their associated functions. The structure of a command looks like this:
/// Commands are stored as linked lists
typedef struct cmd_s {
    char  *nameP;        // command name - string to match
    void (*fnP)();       // function to execute if string matched
    struct cmd_s *nextP; // link to next command in this list
} Command;
The command interpreter code then has only a few EBMonitor-specific portions like those below (and most of those are just for efficiency):
void command_init(void) {
#ifdef USE_EBMONITOR
    // UART1 is normally used for console I/O, but
    // EBLink GDB Server supports console I/O via STLink debug interface
    // so we don't have to use the UART for debugging.  printf output
    // is buffered until \r\n or fflush(stdout) and then displayed in EB monitor
    // input is read from stdin (scanf, fgets, etc.)
    void    EBmonitor_buffer(FILE* , char*, uint16_t);
    #define EBM_outLength 128       // EB Monitor is used for debugging
    #define EBM_inLength 64
    static char EBM_out[EBM_outLength];
    static char EBM_in[EBM_inLength];

    // Route console I/O over the STLink debug interface
    EBmonitor_buffer(stdout, EBM_out, EBM_outLength);
    EBmonitor_buffer(stdin,  EBM_in,  EBM_inLength);
#endif
    // Turn off buffers, so I/O occurs immediately
    setvbuf(stdin, NULL, _IONBF, 0);
    setvbuf(stdout, NULL, _IONBF, 0);
    setvbuf(stderr, NULL, _IONBF, 0);
}
The rest of the command interpreter is the same between UART and STLinkV2 interfaces. For example:
/// Top-level command list
Command *commandsP;

/// Flag indicating a command is ready to be processed
unsigned char cmd_ready;

/// Buffer for current command being entered
#define MAX_CMD_LEN 80
static char cmd[MAX_CMD_LEN];

/// Prompt user for a command
void command_prompt(void) {
   printf("ready>");
   fflush(stdout);
}

/// @returns true if a command is ready for processing
int command_ready(void)
{
    return !!cmd_ready;
}

/// Add a command to the head of the commands list
void command_add(Command **listP, Command *cmdP) {
    if (cmdP && listP) {
        cmdP->nextP = *listP;
        *listP = cmdP;
    }
}

/// Display commands available in the specified command list
static
void list_commands(Command *listP) {
    printf("Commands: ");
    while (listP) {
       printf("%s ", listP->nameP);
       listP = listP->nextP;
    }
    printf("\r\n");
}

// Call regularly from your main loop
void command_process(void)
{
    static int len;   // length of current command in buffer
    int ch = getchar();
    if (ch != EOF) {
        // drop received characters while waiting to process last command
        if (cmd_ready) return;

        if ((ch == '\r') || (ch== '\n')) {
            putchar('\r');
            putchar('\n');
            if (len) {
                cmd[len] = 0; // null terminate current command
                cmd_ready = 1;
                len      = 0;
            } else {
                command_prompt();
            }
        } else if (ch == '\b') {
            if (len) {
                len--;
                putchar(ch);
                putchar(' ');
                putchar(ch);
            } else {
                putchar('\a'); // sound beep
            }
        } else if ((len+1 < MAX_CMD_LEN)) {
            cmd[len++] = ch;
            putchar(ch);
        } else {
            putchar('\a'); // sound beep
        }
    }

    if (cmd_ready) {
        char *command = strtok(cmd, " \r\n");  // extract first command token
        command_execute(commandsP, command);
        command_prompt();
        cmd_ready = 0;
    }

}


/// Search list of commands for specified command and execute if found
void command_execute(Command *listP, char *command) {
    // search list of commands and execute matching command if found
    Command *cmdP = listP;
    while (command && cmdP) {
        if (strcmp(command, cmdP->nameP) == 0) {
            // command found so execute associated function
             cmdP->fnP();
             return;
        }
        cmdP = cmdP->nextP;
    }
    // command not found, show user the command options
    list_commands(listP);

    cmd_ready = 0;
}
When developing for embedded platforms, one of the first things I usually implement is a command-line-interface (CLI) which is invaluable for debugging. Traditionally, I use a UART, but when developing for STM32 targets using my favorite IDE (EmBitz), there’s another option that uses only the STLinkV2 debug probe and so doesn’t consume a UART (or require additional connections to the target). This option is EB monitor which uses the EMBitz GDB server replacement EBlink and works very well.
The documentation for EBmonitor is a bit thin, so here’s an example of how it is used:
#include <stdio.h>

// EBLink GDB Server supports console I/O via STLink debug interface
// so we don't have to use the UART for debugging.  printf output
// is buffered until \r\n or fflush(stdout) and then displayed in EB monitor
// input is read from stdin (scanf, fgets, etc.)
void    EBmonitor_buffer(FILE* , char*, uint16_t);
#define EBM_outLength 128       // EB Monitor is used for debugging
#define EBM_inLength 80
char    EBM_out[EBM_outLength];
char    EBM_in[EBM_inLength];

void cli_init() {
    // Route console I/O over the STLink debug interface
    EBmonitor_buffer(stdout, EBM_out, EBM_outLength);
    EBmonitor_buffer(stdin,  EBM_in,  EBM_inLength);
}

void sample_fn_using_cli() {
    printf("prompt>");
    fflush(stdout); // don't wait for EOL, send prompt now

    char in_buf[80];
    if (fgets(in_buf, sizeof(in_buf), stdin) {
        // process the user input
        char *token = strtok(NULL, " \r\n");
        // process token(s)
    }
}
You can use all the standard format specifiers for printf: %u %s %lu… You can use scanf, fgets, or any of the standard file/stream IO functions Pretty sweet.
Your EmBitz project will have to be configured to use EBmonitor including:
Debug->Plugins->EB monitor->Send NEWLINE as EOL on enter
STLinkV2 clone dongles are dirt cheap and beautifully integrated with EmBitz. You just Build and then start debugging. EmBitz uses the STLink to flash the target very fast and then lets you run in a full source-level debugger where you can set breakpoints, stop the processor, step through code, examine variables and memory. Using the same interface for your CLI means you only need the dongle and 4 wires connected to the target (includes power and ground!) to do development.
I am designing an upgraded product around the Espressif ESP32-WROOM module, a successor to the amazing ESP12. The ESP32-WROOM is a ridiculously inexpensive module built around a 32-bit Xtensa ESP32 dual-core CPU (up to 240MHz each) with 520kB of RAM, 4MB of flash, WiFi and Bluetooth transceivers, and gobs of peripherals. They cost under $4 in low quantity which is simply untouchable in the embedded world.
I develop in C++ using VSCode with PlatformIO.
Flashing the ESP32 target PlatformIO has an infamous problem downloading code to the target. There are dozens of posts suggesting how to tweak the timing of the reset and boot sequence to make it work better, but in the end, the problem turns out to be the version of esptoolpy that is specified by default (2.6). By downgrading to 2.1, everything works like a champ. To do this, you just add a platform_packages specification line to your platformio.ini. Mine looks like this:
I’ve been working from home since the pandemic started and it was becoming increasingly clear that my old gen 3 core-i5 processor wasn’t cutting it anymore. So many aspects of the machine were dated that upgrading pieces wasn’t really going to help anymore (8 year old CPU, DDR3 memory, SATA drive, PCIe 2.0, LGA1155). It was particularly problematic when I needed to run VMs.
At Benji’s suggestion, I took a look at Xeon-based workstations and he was, as usual, correct. Xeons are marketed for high end applications: servers and workstations and often cost $1-2K when new (just the CPU). Workstations are feature-rich and easy to maintain because they sell for several thousand dollars to corporate customers. However those customers need to stay on the leading edge, so they upgrade frequently and those machines hit the used market at much lower prices. I try to stay off the bleeding computing edge because gear devalues so quickly. 4-year old high-end gear is often the sweet-spot. So the new home PC consists of:
The machine cost under $500 and offers a good step up in performance (Passmark 18503 vs. 4645) placing it on par with an i9 9900k but at a much lower price and with a lot more headroom. This machine is well engineered (no screwdrivers required for anything), has a single processor with 14 cores, and I can upgrade to two processors with up to 22 cores each. Memory can upgrade to 256GB, the PCIe storage adapter has an open slot and there are two open SATA bays for bulk storage. The NVMe storage is *way* faster than SATA.
Two issues to be aware of:
1. I was a little worried about fan noise because the system only uses 80mm fans. I’m a fanatic about noise because I work in a very quiet room and any fan noise is noticeable. The system isn’t silent, but it’s not bad either. Although I wish Dell had used 120mm fans, the fan speed is adaptive and in normal use is pretty quiet. The system generally idles with the cores drawing under 15W and temperatures just a few degrees above ambient; as I write this, the cores are at 27C (about 80F)). The CPU gets warm when the cores get busy, but cools down quickly and the fans don’t really kick in unless needed. I replaced the thermal paste with Arctic MX4.
2. I’d planned to move my GTX1060 6GB half-length (single fan) card from my old machine. Unfortunately, the T7810 case has a rubber bar on the cover that comes down over the PCIe boards, perhaps to help keep them seated in shipping and that bar comes down right on top of the GTX’s 6-pin PCIe power connector, preventing the case from closing fully. I have another 1060 in the office that’s a bit longer and will try that at some point, but the GT1030 is silent (fully passive cooling), fits, and is good enough for now; it is no match for a 1060, but I’m not a gamer and Fusion 360 is really the only program I use that needs a good GPU.
Overall, I’m pleased with the system and hope to be able to keep using it for at least 4 years before upgrading again.
In my last Home Automation post, I mentioned that I’d changed from a Staples/DLink hub to a Wink hub after Staples/DLink abruptly terminated support for their products. Well Wink also abruptly changed their business model and decided to start charging customers a stiff monthly fee with very short notice and without which the product became unusable. Bait-and-switch is unethical and unacceptable so I threw the Wink hub in the electronics recycling bin and will never buy from them again…I don’t patronize crooks.
My new hub is a Samsung 3rd gen SmartThings Hub ($67 from amazon) and it looks like a winner. It supports Ethernet for secure, reliable connectivity and serves as a hub for Zigbee and Z-Wave devices. Unlike the Wink hub, I’ve been able to pair *all* of my devices reliably (I could never get some of the devices to pair with the Wink hub). Also unlike the Wink hub, it stays connected reliably, and with the SmartThings hub there is no monthly fee. The phone app is slick and works smoothly and so far I am impressed.
Pairing devices that had been previously paired with my Wink hub required first excluding them using the phone app (Hub-> …Menu -> Z-Wave utilities -> Z-Wave exclusion) and then adding them.
My next sensors will definitely be SmartThings; kudos to Samsung!
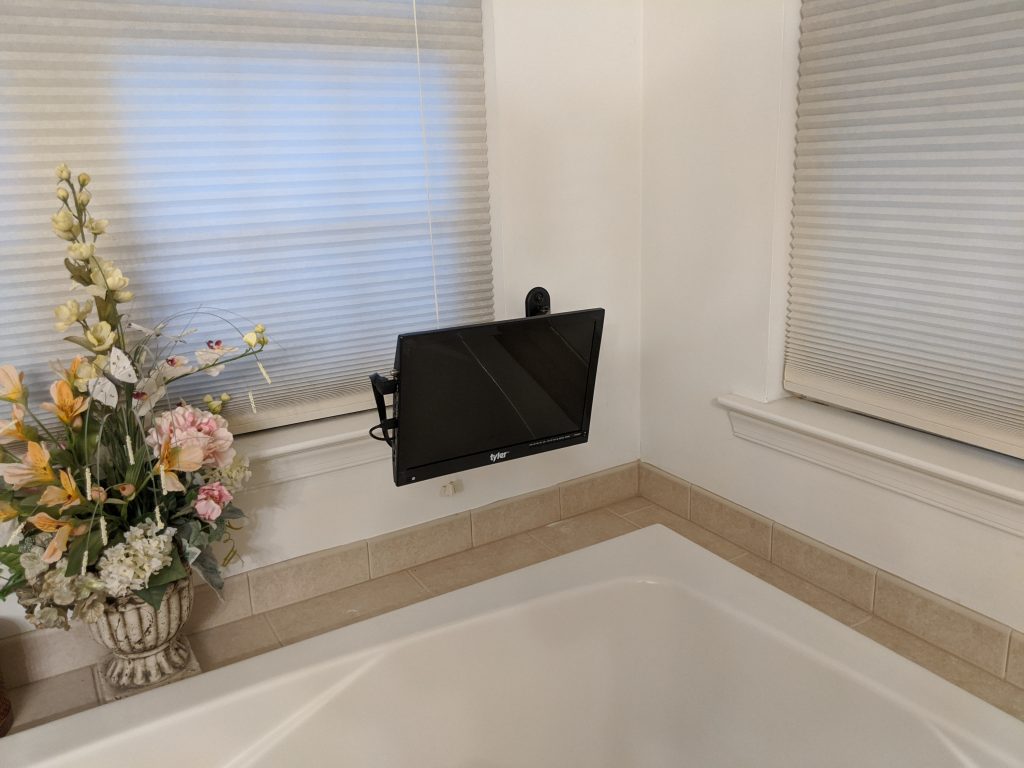
Since we can’t go on vacation during the pandemic, I wanted to make a spa experience for my wife so she can have a bit of a vacation at home. Part of that experience was to be able to relax in the tub while watching her favorite shows. Putting a TV near the tub is challenging for all sorts of reasons, but mainly because I don’t want AC mains power anywhere near the tub. So here was the solution I came up with:
Tyler TTV705-14 Battery-powered, VESA-mountable 14″ TV (eBay)
Mounting Dream full-motion wall-mount TV arm (amazon)
Floating water-activated bath candles (amazon) (for more spa effect)
The overall result was nice (and safe). The TV mounts to the quick release plate which mounts to the wall-mount arm, allowing the TV to be positioned at a good angle for viewing and swiveled back against the wall when not in use. The streaming stick (Roku or Amazon as you prefer) mounts on the back of the TV with industrial velcro and connects to the side of the TV to get power from the USB port and send video to the HDMI input.
I’d worried that 14″ would be too small, but it’s actually just right since you’re pretty close to it in the tub and the audio is quite good. The TV can receive over-the-air channels too if you connect an antenna, but we’re not in a great reception spot so the streaming solution works much better and there’s no unsightly antenna; it’s fully self-contained.
The quick-release VESA plate allows you to easily slide the TV off the wall-mount arm to recharge the battery when needed, but holds it securely in place otherwise. Overall, I’m happy with the solution!
Next steps:
1. Waterproof the remote. I haven’t found a waterproof case for these so I may end up using an amazon echo dot elsewhere in the bathroom to provide voice control…possibly the easiest tub-safe option.
2. Running 12vdc from the ceiling to the TV so it doesn’t need to be removed for charging. This would be a bigger project; using 12vdc keeps it safe (I still don’t want mains power anywhere near the tub), but our tub is in the corner of the house where it will be tough to fish a line to bring down 12vdc power from the attic. If DC power is there permanently, there’s no need for a battery-powered TV that must be charged periodically, so I might then replace it with a slightly larger LCD monitor.
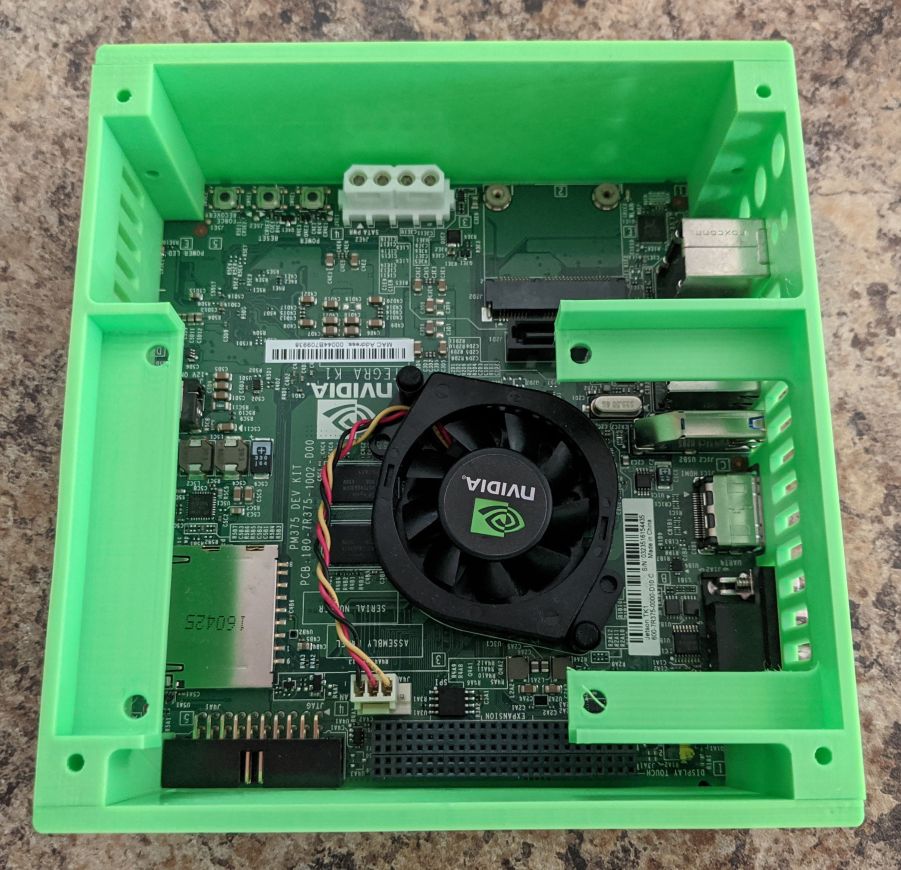
A company on eBay is auctioning off pieces of an old supercomputer cluster someone had built from Jetson TK1s and Intel NUCs. The boards are old, but you get a bunch of them pretty cheap so I bought one since SBCs are always handy for projects.
Jetson TK1 in 3D printed enclosure
The Jetsons are a nice platform for getting one’s feet wet with CUDA for vision and deep learning on a mobile (e.g. robotic) platform. The TK1 is outdated but a nice board with 2GB RAM and 16GB eMMC flash (11GB free) running Ubuntu 14.04 linux. Most importantly, the GPU is an nVidia Kepler GK20a with 192 CUDA cores providing up to 326 GFLOPs.
If you need more power, NVidia has newer boards such as the Jetson Nano ($99), TX1, TX2 ($400), Xavier ($400), and more. The newer boards are better (more memory, faster GPUs, etc.) and use the standard RPi GPIO connector to make hardware interfacing easier, but the TK1 is fine for learning.
Configure to boot from internal eMMC disk
The boards arrive configured for network booting (PXE) and you need to change that if you want to boot into ubuntu from the internal eMMC disk. To do that, you’ll need to connect to the serial port using a null modem cable or adapter and a USB-Serial cable/adapter. The unit starts out running u-boot; you can interact with it using a serial terminal ([https://www.chiark.greenend.org.uk/~sgtatham/putty/latest.html PuTTY], [https://ttssh2.osdn.jp/index.html.en TeraTerm], etc.) configured for 115kbps, 8 data bits, No parity, 1 stop bit. Reset the board and when prompted, press any key to stop the automatic boot within 3 seconds, then you’re at the u-boot prompt. You can change the boot target (default is pxe) using the following commands:
setenv boot_targets mmc0
saveenv
reset
Then when you boot, it will automatically launch ubuntu from the eMMC drive (mmc0) and you can interact with it using an HDMI monitor and USB keyboard/mouse. See here for more useful info on u-boot configuration. The default user name is ubuntu and the password is also ubuntu.
Install JetPack, reflash OS, install CUDA, OpenCV, etc.
Most users will want to use these units to experiment with CUDA-enabled code for vision processing (OpenCV) or machine learning (Tensorflow) on embedded platforms such as robots. nVidia’s tool for flashing Jetsons and loading 3rd party software is called “JetPack” and runs on a host PC running Ubuntu 14.04 linux. Fortunately, you can setup the host PC as a virtual machine (VM) running in any OS (I used Windows 10). The flashing process will require your host PC be connected to the Jetson using a common micro-USB cable and also the Jetson must be connected to the same LAN using an Ethernet cable.
Configure the VM optical drive (DVD) to use the downloaded .iso You’re going to install Ubuntu 14.04 onto the new VM’s drive from the virtual DVD
Configure the VM for bridged networking The Jetpack requires that the VM be on the same local area network as the Jetson.
Configure the VM for USB 3.0 support (Settings->USB) – requires Extension Pack This will make the USB connection used to flash the OS onto your Jetson both more reliable and much faster.
Boot the VM and install Ubuntu
Expand your VM desktop size to at least 1024×768 (1280×768 is better)
Run ifconfig in your VM and make sure eth0 has an address on your local network (it needs this so it can talk with the Jetson after it has flashed the OS)
In the VM, launch Firefox and download nVIdia JetPack 3.1 (you’ll need a free nVidia developer account)
Set the downloaded JetPack-L4T-linux-x64.run to have executable permissions
Launch a command shell and run the downloaded .run file (does not need sudo)
Follow directions: select TK1 as the target board, accept licenses, etc. Then when asked:
Connect your Jetson to Ethernet
Connect your Jetson to your PC via a micro USB cable
Connect your Jetson to 12V power
Configure your Jetson for Forced Recovery mode:
Hold down the Force Recovery button (closest to corner of board)
Press and release the reset (center) button
Wait 2 seconds and then release the Force Recovery button
In VirtualBox, under Devices->USB, select NVIDIA Corp APX (the Jetson) to allow the VM to have access to the Jetson via USB.
In your VM, run the command lsusb in a command window and make sure it shows a device named NVidia Corp. (if not, one of the above steps failed and you’ll need to try it again before proceeding)
If you’re going to use this VM again, you may find it useful to make it automatically capture the nVidia USB connection using VirtualBox USB Device Filters
The Post Installation step will take a long time; flashing the OS only takes ~10 minutes, but if you install and build all of the add-on software it will take more than an hour.
Note: much of the installation time is downloading and building the images for the Jetson. Once that’s been done once, you can launch the installer again and it will skip the unnecessary steps and you can jump ahead to flashing the OS and/or installing the applications. cd ~/JetPack ./JetPack-L4T-3.1-linux-x64.run
Note: if you ever want to just reflash the OS: cd ~/JetPack/TK1/Linux_for_Tegra_tk1 sudo ./flash.sh jetson-tk1 mmcblk0p1 (This may also provide an easy way to flash the OS onto a larger SD card: mmcblk1p1)
When all is done, the Jetpack is fully installed on your VM, your Jetson is flashed with a shiny new OS (well actually an old OS: Ubuntu 14.04), and the important tools have been installed on the Jetson: CUDA, OpenCV, cuBLAS, cuDNN, and Visionworks (which has some really nifty demos installed).
To work with graphics, connect a USB keyboard and mouse and an HDMI monitor. The Jetson GPU is capable of some impressive graphics processing at high frame rates. An Rpi couldn’t touch it.
Be sure to run the samples such as oceanFFT in NVIDIA_CUDA-6.5_Samples/bin and run the gameworks sample (~/run_gameworks_sample.sh). The VisionWorks demos are even more impressive. Go to /usr/share/visionworks/sources and run the command: ./install-samples.sh ~ which will copy the samples to your home directory/VisionWorks-1.4-samples. Then go to ~/VisionWorks-1.4-samples, type make to build the sample programs, and when the build finishes, go to the bin folder and run the samples.
You should now also be able to connect to your Jetson from a remote computer using ssh. You can get the Jetson’s IP address from the serial interface console using the command ifconfig or you can connect to it using its default hostname: tegra-ubuntu.
Remote Graphical Desktop (VNC)
For graphical remote access, consider setting up VNC. You can find instructions here.
VNC isn’t a secure protocol, but if your Jetson isn’t exposed to the internet, you can eliminate the need for the ssh tunnel and VNC directly to the machine. Just change the OPTIONS line in /etc/init.d/vncserver to remove -localhost.
Once VNC is installed, you can connect to the Jetson from a remote computer running VNC Viewer and use a graphical desktop. If you changed the OPTIONS line to remove -localhost, then you can login directly by VNC viewer connecting to host tegra-ubuntu:5901
If you left the OPTIONS line configured with -localhost, you’ll need to create an encrypted tunnel from your remote machine to the Jetson in order to access the VNC server:
Then VNC to localhost:5901 and login with password ubuntu
Some other tweaks you can consider to the xfce4 desktop accessed in VNC:
Fix the default terminal: Press Alt-F2 to launch a program Run xfce4-settings-manager Select Preferred Applications->Utilities->Terminal Emulator->Xfce Terminal
Fix tab-completion in command windows: Press the Applications Menu button (top left) Select Settings->Window Manager->Keyboard->Switch window for same application-> <clear>
Java
If you want to do some Java programming, you can install Oracle Java 8.
Go here and download the Linux ARM 32 Hard Float ABI version (you may need to sign in or create a free account with Oracle)
Make the directory to hold Java and extract it there:
sudo mkdir /usr/lib/jvm
cd /usr/lib/jvm
sudo tar -xzvf ~/jdk-8u261-linux-arm32-vfp-hflt.tar
Edit the file /etc/environment to add java to the search path and create the required Java environment variables. When you’re done the file should look like this: PATH="/usr/local/sbin:/usr/local/bin:/usr/sbin:/usr/bin:/sbin:/bin:/usr/games:/usr/local/games:/usr/lib/jvm/jdk1.8.0_261/bin:/usr/lib/jvm/jdk1.8.0_261/db/bin:/usr/lib/jvm/jdk1.8.0_261/jre/bin" J2SDKDIR="/usr/lib/jvm/jdk1.8.0_261" J2REDIR="/usr/lib/jvm/jdk1.8.0_261/jre" JAVA_HOME="/usr/lib/jvm/jdk1.8.0_261" DERBY_HOME="/usr/lib/jvm/jdk1.8.0_261/db"
Configure the newly installed Java as the default Java:
You can upgrade to 16.04 but I recommend sticking with 14.04; many tools won’t work well with 16.04 and if you’re not careful, the upgrade process can lose the special GPU drivers requiring you to reflash the jetson from scratch. I recommend turning off checking for version upgrades: Applications Menu->Settings->Software & Updates-> Updates Tab->change Notify me of a new Ubuntu version to Never.
NVidia has an active developer forum where you can find answers to almost anything. eLinux is another great reference plus loads of links. For information on the GPIO header see here and also the Jetduino project. Another great site is JetsonHacks. Other useful links:
I’ve been a fan of the STM32 micro-controllers for a long time and EmBitz by Gerard Zagema has been my preferred development environment. I am working on a project that needs a very low-cost microcontroller with fast PWM generation and the new STM32G0 family seems like a perfect fit with packages as small as SO8 and costs under $0.50 with a powerful 32-bit Cortex M0+ core and the same familiar peripheral set as their other uCs.
EmBitz is a light weight, lightning-fast IDE for C and C++ development; previously called Em::Blocks, it is a a fork of Code::Blocks that supports several micro-controller families including STM32 and integrates outstanding debug support. It is free,but I try to support such development and purchased a copy and recommend you do the same. The current version of EmBitz is 1.11; an impending 2.0 release has been announced but is not available yet.
EmBitz 1.11 doesn’t directly support the relatively new STM32G0 family, and many of the STM utilities don’t either (e.g. the latest STLinkUtility 4.5 doesn’t work with it). However, the EmBitz developer has already released an enhanced debugger that supports it and cleanly integrates with EmBitz 1.11. Here’s what I had to do to get STM32G0 development going under EmBitz:
Download and install EmBitz 1.11 (note that the site may be down if you can’t find a copy, email me for a copy)
Download the zip file (press the green Code button and select Download Zip) (NOTE: do not download the windows installer, it isn’t passing my virus checker)
Follow these instructions to install it in EmBitz. The instructions aren’t crystal clear:
unzip the EBlink-master.zip folder
copy the EBlink win32 folder contents into ${EMBITZ}\1.11\share\EBlink
copy the EBlink scripts folder into ${EMBITZ}\1.11\share\EBlink
Download the EBlink interface (v2.0) and extract it to ${EMBITZ}\share\EmBitz\debuggers\Interfaces\
Now, EBlink appears as a debug interface option under GDB Servers and you can use it to load software into your target and debug it in the IDE!
To create an STM32G0 project, I created an STM32L0 project (since it is also Cortex M0+) and replaced the template files with files I gathered (and somewhat modified) from other STMicroelectronics sources:
I have a lot of my personal data (photos, music, etc.) stored on a RAID1 array (two drives that mirror each other so that if one drive dies the other has all of the data). Having my data on a RAID array gave me a lot of confidence that the data was secure…until it died last week. The RAID controller bit the dust, one of the two drives died, and the partition table of the other drive was corrupted. I couldn’t access the data using any windows utilities or fdisk, gdisk, gparted or ddrescue. I realized I hadn’t backed that storage up in more than a year.
It was starting to look grim, when I read about testdisk and gave it a try…and it worked like a champ. testdisk recognized the damaged partition and and gave me access to the NTFS file system. I was able to copy the data onto a good drive so all is good (and I’m going to be a lot better about backups). Thanks testdisk!