
A company on eBay is auctioning off pieces of an old supercomputer cluster someone had built from Jetson TK1s and Intel NUCs. The boards are old, but you get a bunch of them pretty cheap so I bought one since SBCs are always handy for projects.
The Jetsons are a nice platform for getting one’s feet wet with CUDA for vision and deep learning on a mobile (e.g. robotic) platform. The TK1 is outdated but a nice board with 2GB RAM and 16GB eMMC flash (11GB free) running Ubuntu 14.04 linux. Most importantly, the GPU is an nVidia Kepler GK20a with 192 CUDA cores providing up to 326 GFLOPs.
If you need more power, NVidia has newer boards such as the Jetson Nano ($99), TX1, TX2 ($400), Xavier ($400), and more. The newer boards are better (more memory, faster GPUs, etc.) and use the standard RPi GPIO connector to make hardware interfacing easier, but the TK1 is fine for learning.
Configure to boot from internal eMMC disk
The boards arrive configured for network booting (PXE) and you need to change that if you want to boot into ubuntu from the internal eMMC disk. To do that, you’ll need to connect to the serial port using a null modem cable or adapter and a USB-Serial cable/adapter. The unit starts out running u-boot; you can interact with it using a serial terminal ([https://www.chiark.greenend.org.uk/~sgtatham/putty/latest.html PuTTY], [https://ttssh2.osdn.jp/index.html.en TeraTerm], etc.) configured for 115kbps, 8 data bits, No parity, 1 stop bit. Reset the board and when prompted, press any key to stop the automatic boot within 3 seconds, then you’re at the u-boot prompt. You can change the boot target (default is pxe) using the following commands:
setenv boot_targets mmc0
saveenv
reset
Then when you boot, it will automatically launch ubuntu from the eMMC drive (mmc0) and you can interact with it using an HDMI monitor and USB keyboard/mouse. See here for more useful info on u-boot configuration. The default user name is ubuntu and the password is also ubuntu.
Install JetPack, reflash OS, install CUDA, OpenCV, etc.
Most users will want to use these units to experiment with CUDA-enabled code for vision processing (OpenCV) or machine learning (Tensorflow) on embedded platforms such as robots. nVidia’s tool for flashing Jetsons and loading 3rd party software is called “JetPack” and runs on a host PC running Ubuntu 14.04 linux. Fortunately, you can setup the host PC as a virtual machine (VM) running in any OS (I used Windows 10). The flashing process will require your host PC be connected to the Jetson using a common micro-USB cable and also the Jetson must be connected to the same LAN using an Ethernet cable.
Here’s how:
- Install VirtualBox and Extension Pack
- Create a VirtualBox VM for Ubuntu Linux.
Allocate at least 2GB of RAM and 30GB (64GB is better) for the max disk size. - Download the Ubuntu 14.04 desktop .iso
Jetpack 3.1 requires 14.04, don’t bother trying something newer. - Configure the VM optical drive (DVD) to use the downloaded .iso
You’re going to install Ubuntu 14.04 onto the new VM’s drive from the virtual DVD - Configure the VM for bridged networking
The Jetpack requires that the VM be on the same local area network as the Jetson. - Configure the VM for USB 3.0 support (Settings->USB) – requires Extension Pack
This will make the USB connection used to flash the OS onto your Jetson both more reliable and much faster. - Boot the VM and install Ubuntu
- Expand your VM desktop size to at least 1024×768 (1280×768 is better)
- Run ifconfig in your VM and make sure eth0 has an address on your local network
(it needs this so it can talk with the Jetson after it has flashed the OS) - In the VM, launch Firefox and download nVIdia JetPack 3.1
(you’ll need a free nVidia developer account) - Set the downloaded JetPack-L4T-linux-x64.run to have executable permissions
- Launch a command shell and run the downloaded .run file (does not need sudo)
- Follow directions: select TK1 as the target board, accept licenses, etc. Then when asked:
- Connect your Jetson to Ethernet
- Connect your Jetson to your PC via a micro USB cable
- Connect your Jetson to 12V power
- Configure your Jetson for Forced Recovery mode:
- Hold down the Force Recovery button (closest to corner of board)
- Press and release the reset (center) button
- Wait 2 seconds and then release the Force Recovery button
- In VirtualBox, under Devices->USB, select NVIDIA Corp APX (the Jetson) to allow the VM to have access to the Jetson via USB.
- In your VM, run the command lsusb in a command window and make sure it shows a device named NVidia Corp. (if not, one of the above steps failed and you’ll need to try it again before proceeding)
- If you’re going to use this VM again, you may find it useful to make it automatically capture the nVidia USB connection using VirtualBox USB Device Filters
- The Post Installation step will take a long time; flashing the OS only takes ~10 minutes, but if you install and build all of the add-on software it will take more than an hour.
- Note: much of the installation time is downloading and building the images for the Jetson. Once that’s been done once, you can launch the installer again and it will skip the unnecessary steps and you can jump ahead to flashing the OS and/or installing the applications.
cd ~/JetPack
./JetPack-L4T-3.1-linux-x64.run - Note: if you ever want to just reflash the OS:
cd ~/JetPack/TK1/Linux_for_Tegra_tk1(This may also provide an easy way to flash the OS onto a larger SD card: mmcblk1p1)
sudo ./flash.sh jetson-tk1 mmcblk0p1
When all is done, the Jetpack is fully installed on your VM, your Jetson is flashed with a shiny new OS (well actually an old OS: Ubuntu 14.04), and the important tools have been installed on the Jetson: CUDA, OpenCV, cuBLAS, cuDNN, and Visionworks (which has some really nifty demos installed).
To work with graphics, connect a USB keyboard and mouse and an HDMI monitor. The Jetson GPU is capable of some impressive graphics processing at high frame rates. An Rpi couldn’t touch it.
Be sure to run the samples such as oceanFFT in NVIDIA_CUDA-6.5_Samples/bin and run the gameworks sample (~/run_gameworks_sample.sh). The VisionWorks demos are even more impressive. Go to /usr/share/visionworks/sources and run the command: ./install-samples.sh ~ which will copy the samples to your home directory/VisionWorks-1.4-samples. Then go to ~/VisionWorks-1.4-samples, type make to build the sample programs, and when the build finishes, go to the bin folder and run the samples.
You should now also be able to connect to your Jetson from a remote computer using ssh. You can get the Jetson’s IP address from the serial interface console using the command ifconfig or you can connect to it using its default hostname: tegra-ubuntu.
Remote Graphical Desktop (VNC)
For graphical remote access, consider setting up VNC. You can find instructions here.
VNC isn’t a secure protocol, but if your Jetson isn’t exposed to the internet, you can eliminate the need for the ssh tunnel and VNC directly to the machine. Just change the OPTIONS line in /etc/init.d/vncserver to remove -localhost.
Once VNC is installed, you can connect to the Jetson from a remote computer running VNC Viewer and use a graphical desktop. If you changed the OPTIONS line to remove -localhost, then you can login directly by VNC viewer connecting to host tegra-ubuntu:5901
If you left the OPTIONS line configured with -localhost, you’ll need to create an encrypted tunnel from your remote machine to the Jetson in order to access the VNC server:
- ssh -L 5901:localhost:5901 -N -f -l ubuntu tegra-ubuntu
- Then VNC to localhost:5901 and login with password ubuntu
Some other tweaks you can consider to the xfce4 desktop accessed in VNC:
- Fix the default terminal:
Press Alt-F2 to launch a program
Run xfce4-settings-manager
Select Preferred Applications->Utilities->Terminal Emulator->Xfce Terminal - Fix tab-completion in command windows:
Press the Applications Menu button (top left)
Select Settings->Window Manager->Keyboard->Switch window for same application-> <clear>
Java
If you want to do some Java programming, you can install Oracle Java 8.
- Go here and download the Linux ARM 32 Hard Float ABI version (you may need to sign in or create a free account with Oracle)
- Use sftp to transfer the downloaded file (e.g. jdk-8u261-linux-arm32-vfp-hflt.tar.gz) your Jetson
- Make the directory to hold Java and extract it there:
- sudo mkdir /usr/lib/jvm
- cd /usr/lib/jvm
- sudo tar -xzvf ~/jdk-8u261-linux-arm32-vfp-hflt.tar
- Edit the file /etc/environment to add java to the search path and create the required Java environment variables. When you’re done the file should look like this:
PATH="/usr/local/sbin:/usr/local/bin:/usr/sbin:/usr/bin:/sbin:/bin:/usr/games:/usr/local/games:/usr/lib/jvm/jdk1.8.0_261/bin:/usr/lib/jvm/jdk1.8.0_261/db/bin:/usr/lib/jvm/jdk1.8.0_261/jre/bin"
J2SDKDIR="/usr/lib/jvm/jdk1.8.0_261"
J2REDIR="/usr/lib/jvm/jdk1.8.0_261/jre"
JAVA_HOME="/usr/lib/jvm/jdk1.8.0_261"
DERBY_HOME="/usr/lib/jvm/jdk1.8.0_261/db" - Configure the newly installed Java as the default Java:
sudo update-alternatives --install "/usr/bin/java" "java" "/usr/lib/jvm/jdk1.8.0_261/bin/java" 0sudo update-alternatives --install "/usr/bin/javac" "javac" "/usr/lib/jvm/jdk1.8.0_261/bin/javac" 0sudo update-alternatives --set java /usr/lib/jvm/jdk1.8.0_261/bin/javasudo update-alternatives --set javac /usr/lib/jvm/jdk1.8.0_261/bin/javac
- If you want to install JavaFX, see here.
- Reboot the system
More…
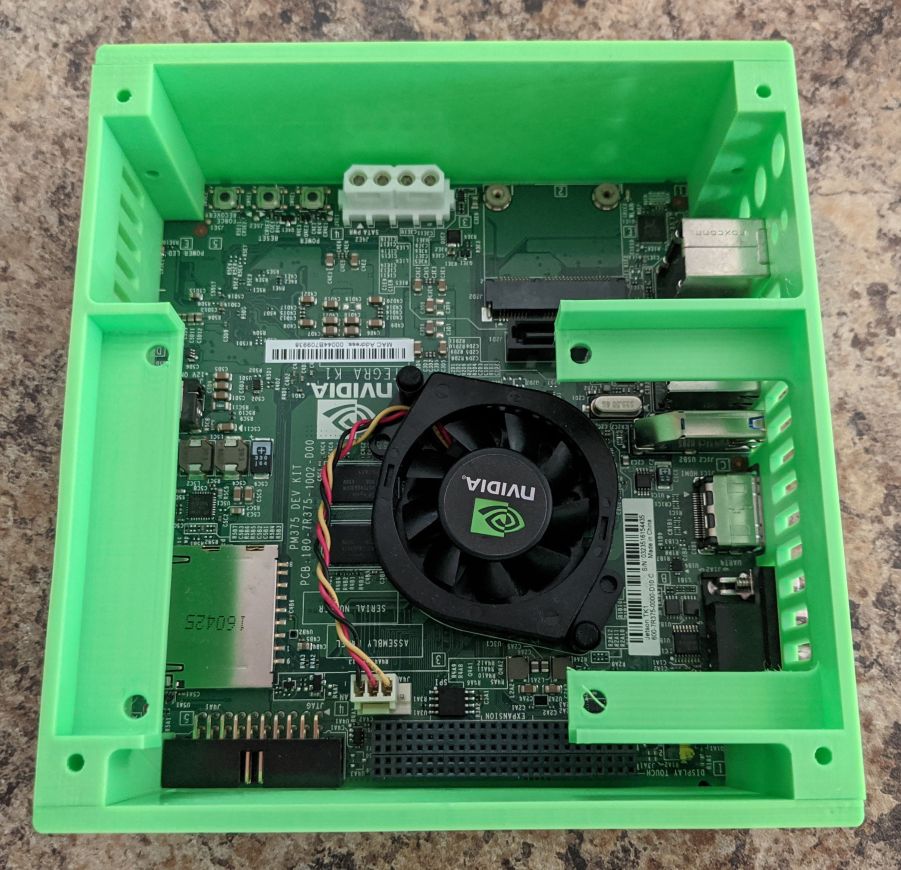
From what I’ve read, the fan is only needed when maxing out the CPU/GPU and in most cases, you can replace the fan with a heatsink.
You can upgrade to 16.04 but I recommend sticking with 14.04; many tools won’t work well with 16.04 and if you’re not careful, the upgrade process can lose the special GPU drivers requiring you to reflash the jetson from scratch. I recommend turning off checking for version upgrades: Applications Menu->Settings->Software & Updates-> Updates Tab->change Notify me of a new Ubuntu version to Never.
NVidia has an active developer forum where you can find answers to almost anything. eLinux is another great reference plus loads of links. For information on the GPIO header see here and also the Jetduino project. Another great site is JetsonHacks. Other useful links:
- Hardware specifications
- Enclosures:
- 3D printable I used these #4-40 x 7/16″ screws and these switches.
- laser cut (acrylic)
- eLinux
- Jetpack 3.1 (L4T 21.5 from July 2016)
- L4T 21.6 (last version supporting TK1 from October 2017)
- https://demotomohiro.github.io/hardware/jetson_tk1/index.html
- ZED stereo camera setup (good details on JetPack installation too)
- MOPED project using TK1 for vision processing
- Jetson award winning projects