I am designing an upgraded product around the Espressif ESP32-WROOM module, a successor to the amazing ESP12. The ESP32-WROOM is a ridiculously inexpensive module built around a 32-bit Xtensa ESP32 dual-core CPU (up to 240MHz each) with 520kB of RAM, 4MB of flash, WiFi and Bluetooth transceivers, and gobs of peripherals. They cost under $4 in low quantity which is simply untouchable in the embedded world.
I develop in C++ using VSCode with PlatformIO.
Flashing the ESP32 target PlatformIO has an infamous problem downloading code to the target. There are dozens of posts suggesting how to tweak the timing of the reset and boot sequence to make it work better, but in the end, the problem turns out to be the version of esptoolpy that is specified by default (2.6). By downgrading to 2.1, everything works like a champ. To do this, you just add a platform_packages specification line to your platformio.ini. Mine looks like this:
I’ve been working from home since the pandemic started and it was becoming increasingly clear that my old gen 3 core-i5 processor wasn’t cutting it anymore. So many aspects of the machine were dated that upgrading pieces wasn’t really going to help anymore (8 year old CPU, DDR3 memory, SATA drive, PCIe 2.0, LGA1155). It was particularly problematic when I needed to run VMs.
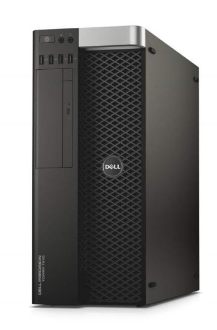
At Benji’s suggestion, I took a look at Xeon-based workstations and he was, as usual, correct. Xeons are marketed for high end applications: servers and workstations and often cost $1-2K when new (just the CPU). Workstations are feature-rich and easy to maintain because they sell for several thousand dollars to corporate customers. However those customers need to stay on the leading edge, so they upgrade frequently and those machines hit the used market at much lower prices. I try to stay off the bleeding computing edge because gear devalues so quickly. 4-year old high-end gear is often the sweet-spot. So the new home PC consists of:
The machine cost under $500 and offers a good step up in performance (Passmark 18503 vs. 4645) placing it on par with an i9 9900k but at a much lower price and with a lot more headroom. This machine is well engineered (no screwdrivers required for anything), has a single processor with 14 cores, and I can upgrade to two processors with up to 22 cores each. Memory can upgrade to 256GB, the PCIe storage adapter has an open slot and there are two open SATA bays for bulk storage. The NVMe storage is *way* faster than SATA.
Two issues to be aware of:
1. I was a little worried about fan noise because the system only uses 80mm fans. I’m a fanatic about noise because I work in a very quiet room and any fan noise is noticeable. The system isn’t silent, but it’s not bad either. Although I wish Dell had used 120mm fans, the fan speed is adaptive and in normal use is pretty quiet. The system generally idles with the cores drawing under 15W and temperatures just a few degrees above ambient; as I write this, the cores are at 27C (about 80F)). The CPU gets warm when the cores get busy, but cools down quickly and the fans don’t really kick in unless needed. I replaced the thermal paste with Arctic MX4.
2. I’d planned to move my GTX1060 6GB half-length (single fan) card from my old machine. Unfortunately, the T7810 case has a rubber bar on the cover that comes down over the PCIe boards, perhaps to help keep them seated in shipping and that bar comes down right on top of the GTX’s 6-pin PCIe power connector, preventing the case from closing fully. I have another 1060 in the office that’s a bit longer and will try that at some point, but the GT1030 is silent (fully passive cooling), fits, and is good enough for now; it is no match for a 1060, but I’m not a gamer and Fusion 360 is really the only program I use that needs a good GPU.
Overall, I’m pleased with the system and hope to be able to keep using it for at least 4 years before upgrading again.
I used an Atmel ATTiny13A in a project; it only has 8 pins and all are in use. There isn’t much memory (program or data), so debugging can be a challenge…but fortunately, there’s Atmel-ICE to the rescue! The Atmel-ICE (see product page) is inexpensive and can be used to program and debug Atmel SAM (ARM) and AVR targets. To get real value out of it, you need to use it with Atmel Studio: their free IDE built on Visual Studio.
Connector weirdness: The ICE connects to your PC with a micro-USB cable and to your target with a ribbon
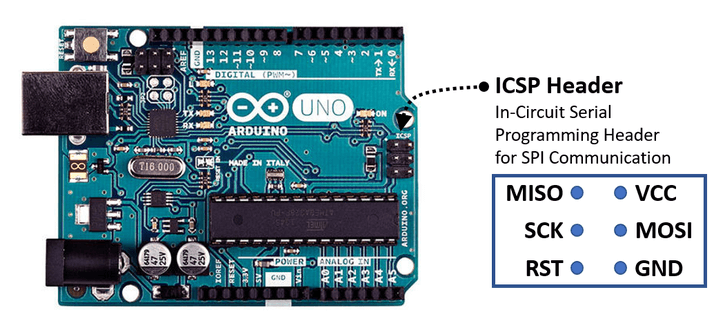
cable (ATATMEL-ICE-CABLE). The cable has both a 10-pin 50-mil JTAG connector and a 6-pin 100-mil SPI ICSP/DW connector configured for the standard AVR ICSP pinout. The red wire on the cable denotes JTAG pin 1; when connecting to an AVR ICSP header the red wire connects to pin 3 (SCK). Strangely, the pin 1 indicator on the 6-pin plug does not denote pin 1 but actually connects to pin 5 (nReset). Anyway, you can trust that the 6-pin connector is correctly wired for the ICSP header (SPI/DW) even though the markings suggest otherwise. Assuming your ICSP header has pin 1 (MISO) in the top left, then the key bump on the plug and the red wire will be on the left side. For examples, see this picture showing the connection to an Uno or this closeup showing the connection to a Mega.
Unlike most of the ICSP programmers, the ICE does not supply power to the target; the power pin (2) is just used to detect the target voltage. The green LED near the edge ICE enclosure indicates target power. This is unfortunate as it makes it much less useful as a programmer, but it allows it to work with both 3v3 and 5V targets. (I would have preferred if they had added a target voltage switch and a 3v3 regulator)
You can use the ICE in two connection modes: ICSP (SPI) for flashing the target only or serial debugWIRE (which is where the really neat stuff happens). DebugWIRE is Atmel’s one-wire in-circuit debugging solution using only the reset pin! In this mode, you can connect to your target, set breakpoints, examine variables (sort of), step through code, and do real source-level debugging while still using all of the pins on your target. Kudos to Atmel…this is really slick…and it works! (Note: you have to set the debugWIRE enable fuse on the target – Atmel Studio will prompt you to do this). Don’t forget to clear that fuse when you’re done debugging!
Atmel studio works well; you add your files into the Solution Explorer, build, and start debugging! The only really annoying thing is that the debugger doesn’t let you examine variables that have been optimized away by the compiler (and you usually need to build with the code optimized because there is so little code space)…so if you want to examine variables, you need to make them global.
In my last Home Automation post, I mentioned that I’d changed from a Staples/DLink hub to a Wink hub after Staples/DLink abruptly terminated support for their products. Well Wink also abruptly changed their business model and decided to start charging customers a stiff monthly fee with very short notice and without which the product became unusable. Bait-and-switch is unethical and unacceptable so I threw the Wink hub in the electronics recycling bin and will never buy from them again…I don’t patronize crooks.
My new hub is a Samsung 3rd gen SmartThings Hub ($67 from amazon) and it looks like a winner. It supports Ethernet for secure, reliable connectivity and serves as a hub for Zigbee and Z-Wave devices. Unlike the Wink hub, I’ve been able to pair *all* of my devices reliably (I could never get some of the devices to pair with the Wink hub). Also unlike the Wink hub, it stays connected reliably, and with the SmartThings hub there is no monthly fee. The phone app is slick and works smoothly and so far I am impressed.
Pairing devices that had been previously paired with my Wink hub required first excluding them using the phone app (Hub-> …Menu -> Z-Wave utilities -> Z-Wave exclusion) and then adding them.
My next sensors will definitely be SmartThings; kudos to Samsung!


