I used an Atmel ATTiny13A in a project; it only has 8 pins and all are in use. There isn’t much memory (program or data), so debugging can be a challenge…but fortunately, there’s Atmel-ICE to the rescue! The Atmel-ICE (see product page) is inexpensive and can be used to program and debug Atmel SAM (ARM) and AVR targets. To get real value out of it, you need to use it with Atmel Studio: their free IDE built on Visual Studio.
Connector weirdness: The ICE connects to your PC with a micro-USB cable and to your target with a ribbon
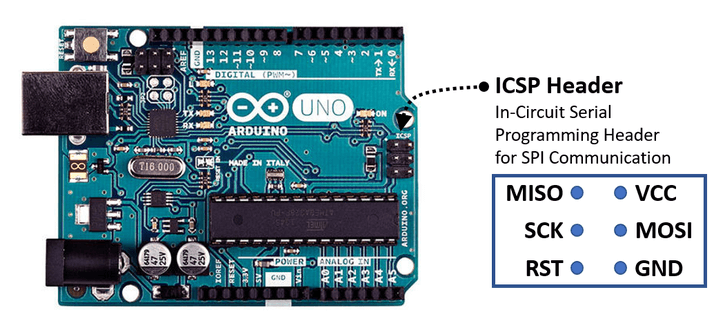
cable (ATATMEL-ICE-CABLE). The cable has both a 10-pin 50-mil JTAG connector and a 6-pin 100-mil SPI ICSP/DW connector configured for the standard AVR ICSP pinout. The red wire on the cable denotes JTAG pin 1; when connecting to an AVR ICSP header the red wire connects to pin 3 (SCK). Strangely, the pin 1 indicator on the 6-pin plug does not denote pin 1 but actually connects to pin 5 (nReset). Anyway, you can trust that the 6-pin connector is correctly wired for the ICSP header (SPI/DW) even though the markings suggest otherwise. Assuming your ICSP header has pin 1 (MISO) in the top left, then the key bump on the plug and the red wire will be on the left side. For examples, see this picture showing the connection to an Uno or this closeup showing the connection to a Mega.
Unlike most of the ICSP programmers, the ICE does not supply power to the target; the power pin (2) is just used to detect the target voltage. The green LED near the edge ICE enclosure indicates target power. This is unfortunate as it makes it much less useful as a programmer, but it allows it to work with both 3v3 and 5V targets. (I would have preferred if they had added a target voltage switch and a 3v3 regulator)
You can use the ICE in two connection modes: ICSP (SPI) for flashing the target only or serial debugWIRE (which is where the really neat stuff happens). DebugWIRE is Atmel’s one-wire in-circuit debugging solution using only the reset pin! In this mode, you can connect to your target, set breakpoints, examine variables (sort of), step through code, and do real source-level debugging while still using all of the pins on your target. Kudos to Atmel…this is really slick…and it works! (Note: you have to set the debugWIRE enable fuse on the target – Atmel Studio will prompt you to do this). Don’t forget to clear that fuse when you’re done debugging!
Atmel studio works well; you add your files into the Solution Explorer, build, and start debugging! The only really annoying thing is that the debugger doesn’t let you examine variables that have been optimized away by the compiler (and you usually need to build with the code optimized because there is so little code space)…so if you want to examine variables, you need to make them global.
In my last Home Automation post, I mentioned that I’d changed from a Staples/DLink hub to a Wink hub after Staples/DLink abruptly terminated support for their products. Well Wink also abruptly changed their business model and decided to start charging customers a stiff monthly fee with very short notice and without which the product became unusable. Bait-and-switch is unethical and unacceptable so I threw the Wink hub in the electronics recycling bin and will never buy from them again…I don’t patronize crooks.
My new hub is a Samsung 3rd gen SmartThings Hub ($67 from amazon) and it looks like a winner. It supports Ethernet for secure, reliable connectivity and serves as a hub for Zigbee and Z-Wave devices. Unlike the Wink hub, I’ve been able to pair *all* of my devices reliably (I could never get some of the devices to pair with the Wink hub). Also unlike the Wink hub, it stays connected reliably, and with the SmartThings hub there is no monthly fee. The phone app is slick and works smoothly and so far I am impressed.
Pairing devices that had been previously paired with my Wink hub required first excluding them using the phone app (Hub-> …Menu -> Z-Wave utilities -> Z-Wave exclusion) and then adding them.
My next sensors will definitely be SmartThings; kudos to Samsung!
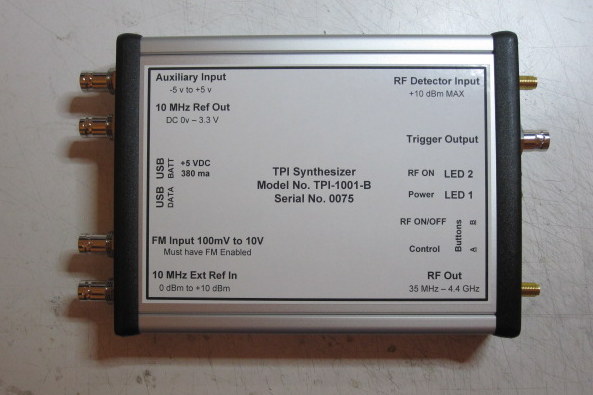
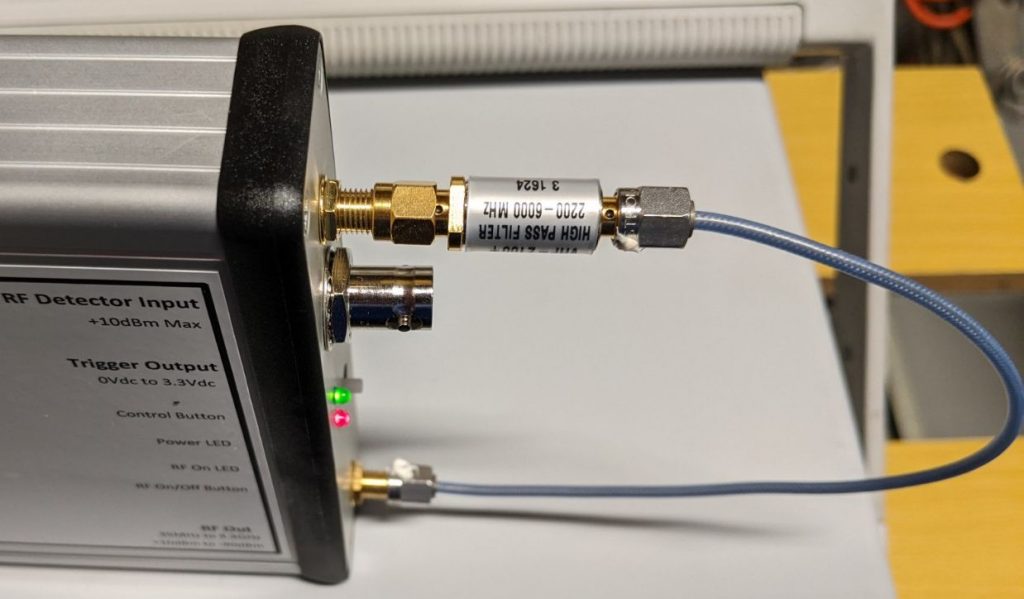
An RF signal generator is an important part of my wireless workbench. In the lab, I use high end gear made by HP, Marconi, or Anritsu, but these are big expensive pieces of equipment with loud fans so I don’t want them at my desk. Enter the TPI-1001B RF signal generator/analyzer from RF-Consultant. This is a USB-powered signal generator that generates clean RF CW signals from 35MHz to 4.4GHz at up to +10dBm…and does it accurately! It even has an accurate power detector that can be used in conjunction with the generator to sweep filters and such (more below).
The TPI-1001-B generator/analyzer costs a good deal more (~$350) than the cheap RF signal generators on eBay. I assume it is based on the same Analog Devices ADF4351 synthesizer, but the price difference is fully justified. The cheap synthesizers are not calibrated for amplitude and many don’t use a good enough time-base to be accurate for frequency either. A signal generator without accurate frequency and amplitude is a toy, this is a tool.
Note: they offer a less expensive (~$275) version (TPI-1002-A) that has the same signal generator but does not include the analyzer (which I thought it was worth the extra $75). I might buy one of these later for another workstation.
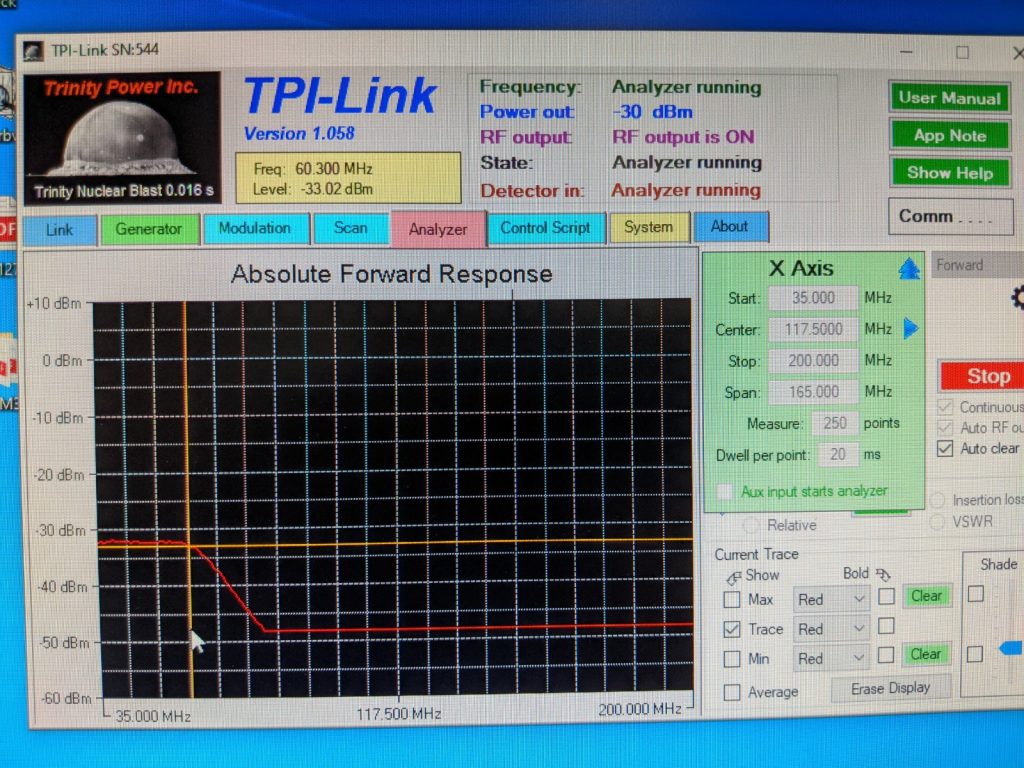
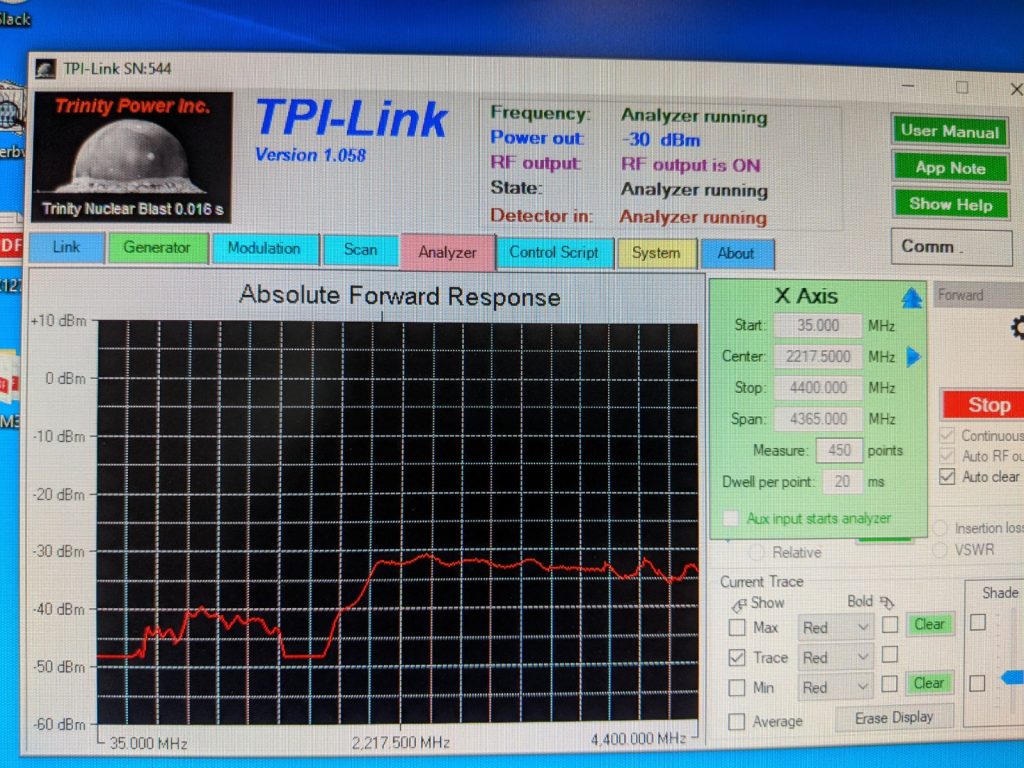
The good news is that both the generator and the analyzer work extremely well. The software is straight-forward and easy to use; I love the frequency presets. The device is compact, silent, and performs admirably. I’ll share some pics below of the CW output including sweeps of a few filters. As promised, it stayed well within 1dB of the configured output setting across a wide range of frequencies and the frequency accuracy was impressive as well (the measurements below are from a spectrum analyzer with a rubidium standard).
The main difference between the TPI and a lab-grade generator is that it lacks output filtering to suppress harmonics (you’ll see that in the pics too), but that’s expected.
As it is, it replaces the lab gear for most of my needs, but here’s my wish list for future versions:
A set of switchable ceramic or SAW filters would add little cost and make their calibration process more complex, but it would make the generator able to fully replace lab-grade gear in many applications. Johanson makes great low cost SMT ceramic filters.
An internal FM modulation generator.
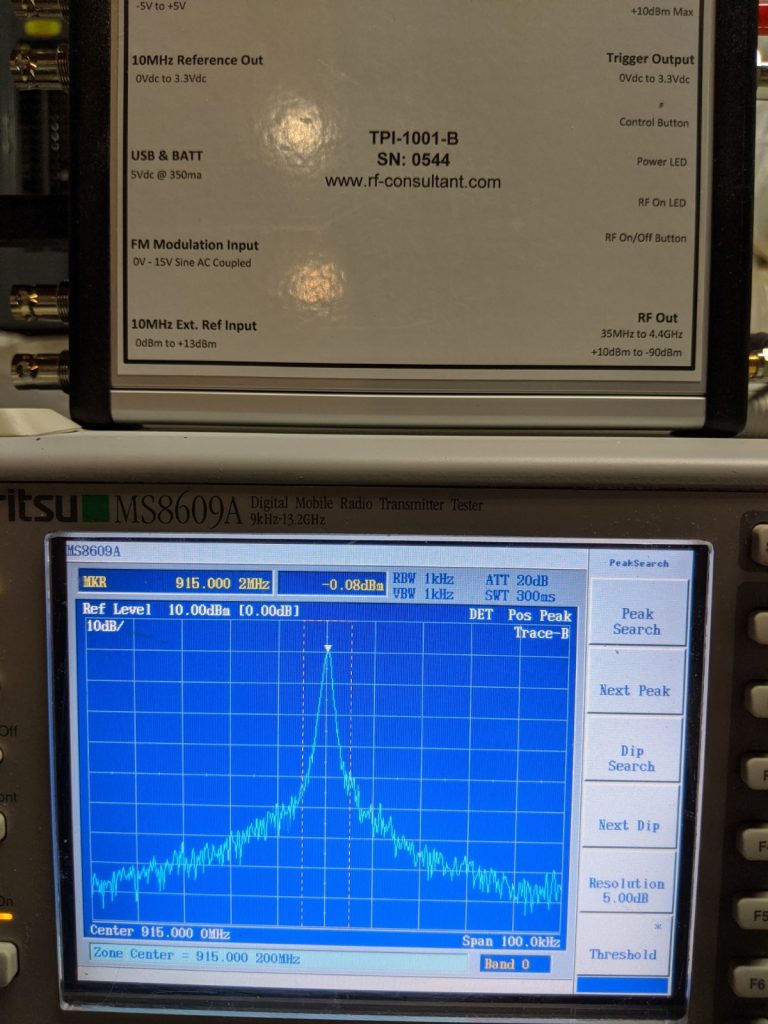
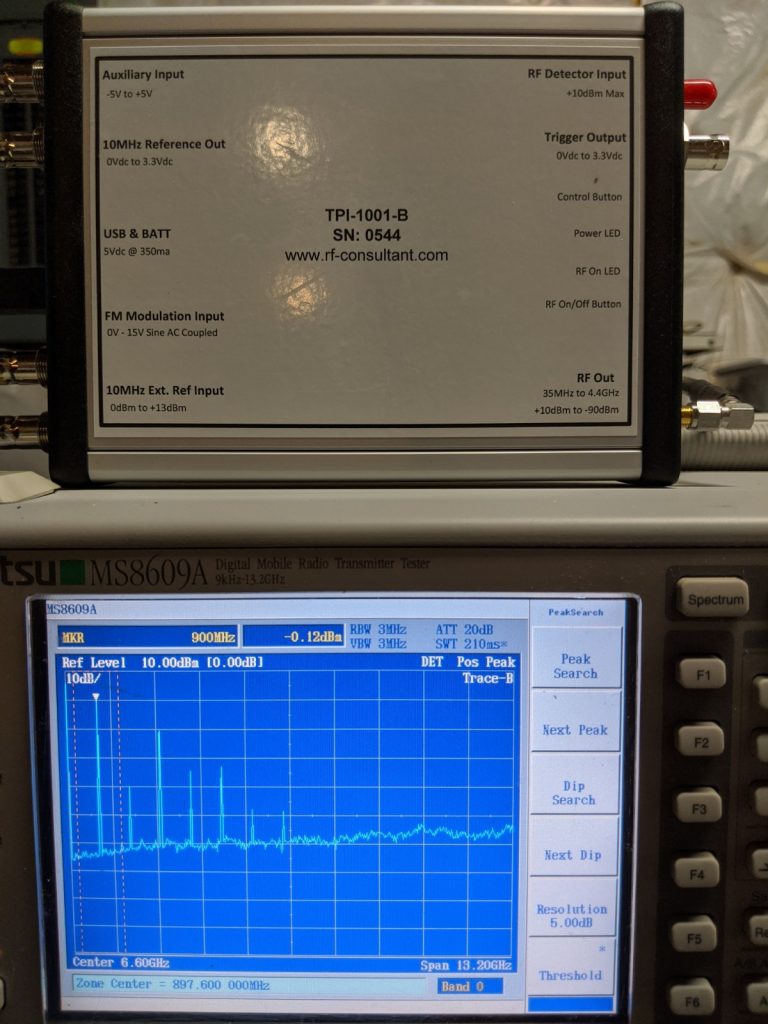
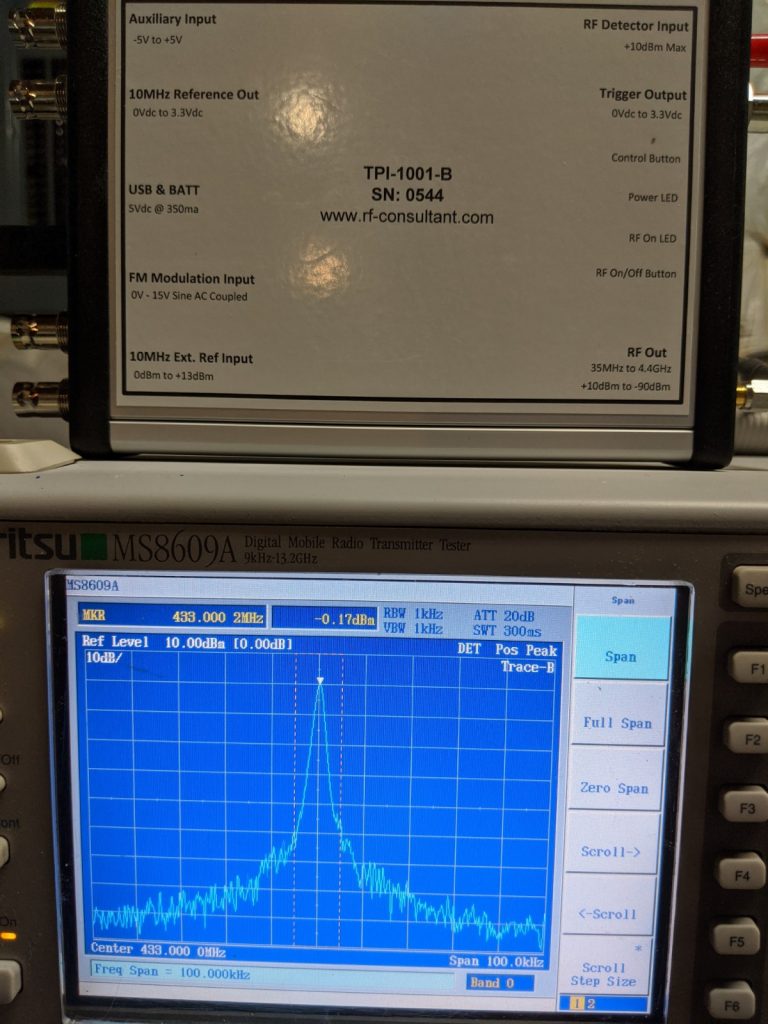
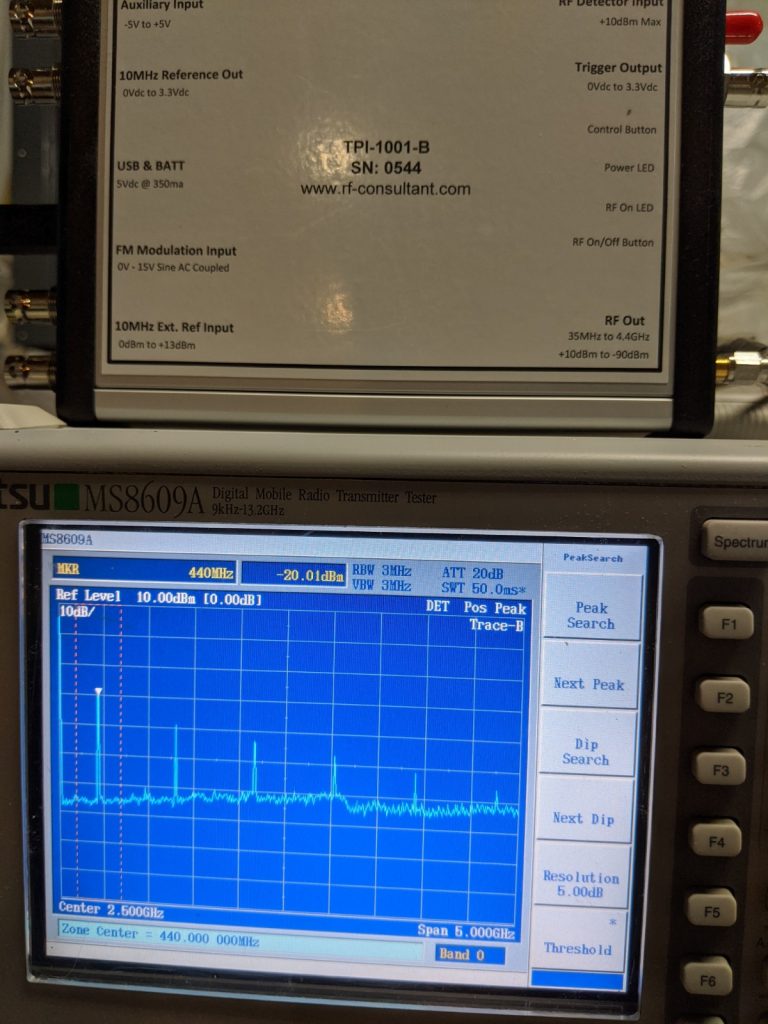
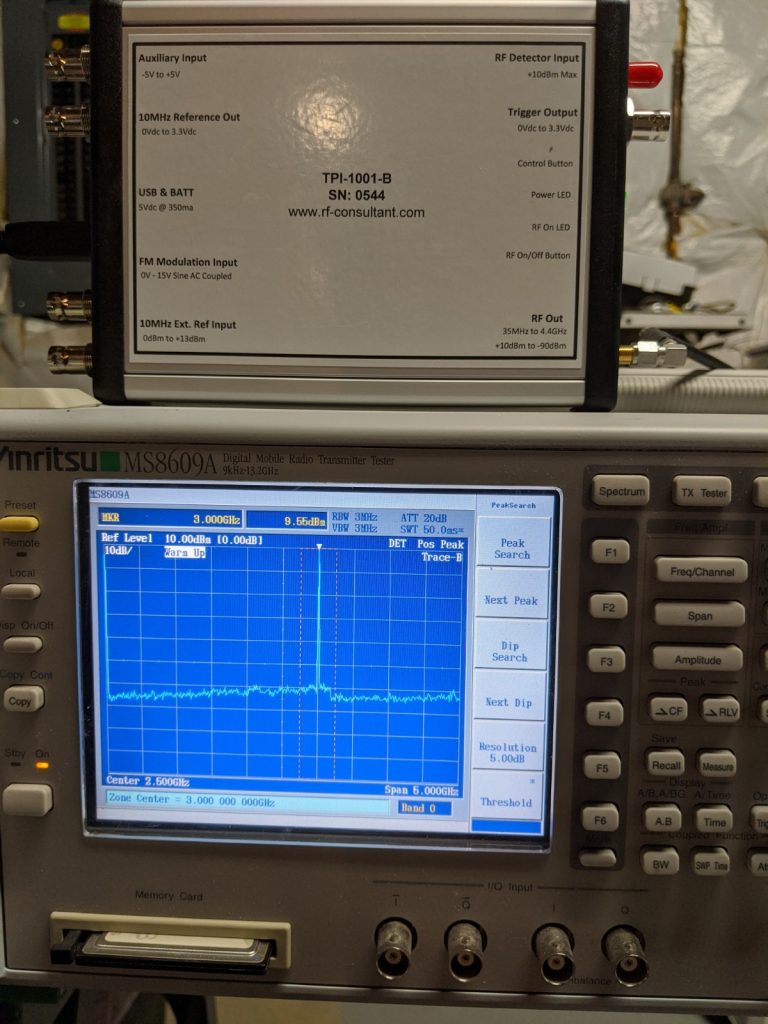
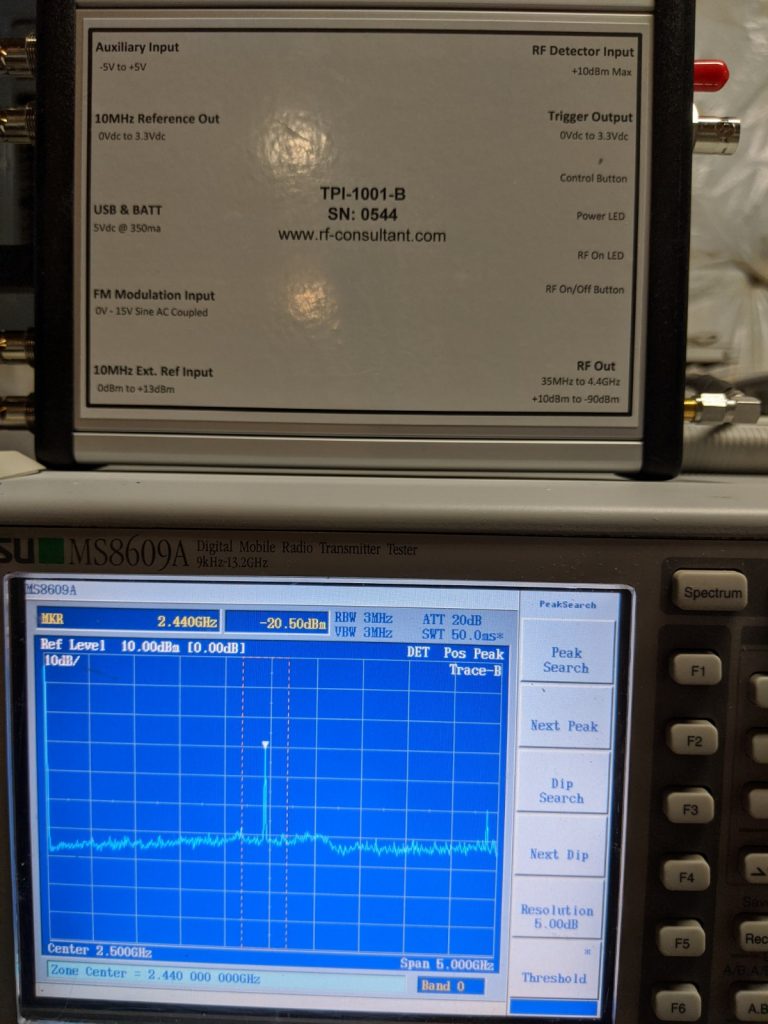
Below are some tests I ran with the generator into an Anritsu MS8609A transmitter analyzer. I did not compensate for cable loss, but it was a short, high-quality (low loss) cable and the results speak for themselves.
Signal generator configured for 915MHz at 0dBm.915MHz harmonics – fundamental is 0dBm, 3rd is -10.8dBc, 5th is -23.11dBc433MHz is also perfect for frequency and amplitude433MHz signal and harmonics3GHz signal at +10dBm2.4GHz signal at -20dBm and harmonicsweeping a 60MHz low-pass filter (microcircuit SLP-70+)Sweeping a 2.2GHz-6GHz bandpass filter (high-pass for these purposes since only sweeps to 4.4GHz)
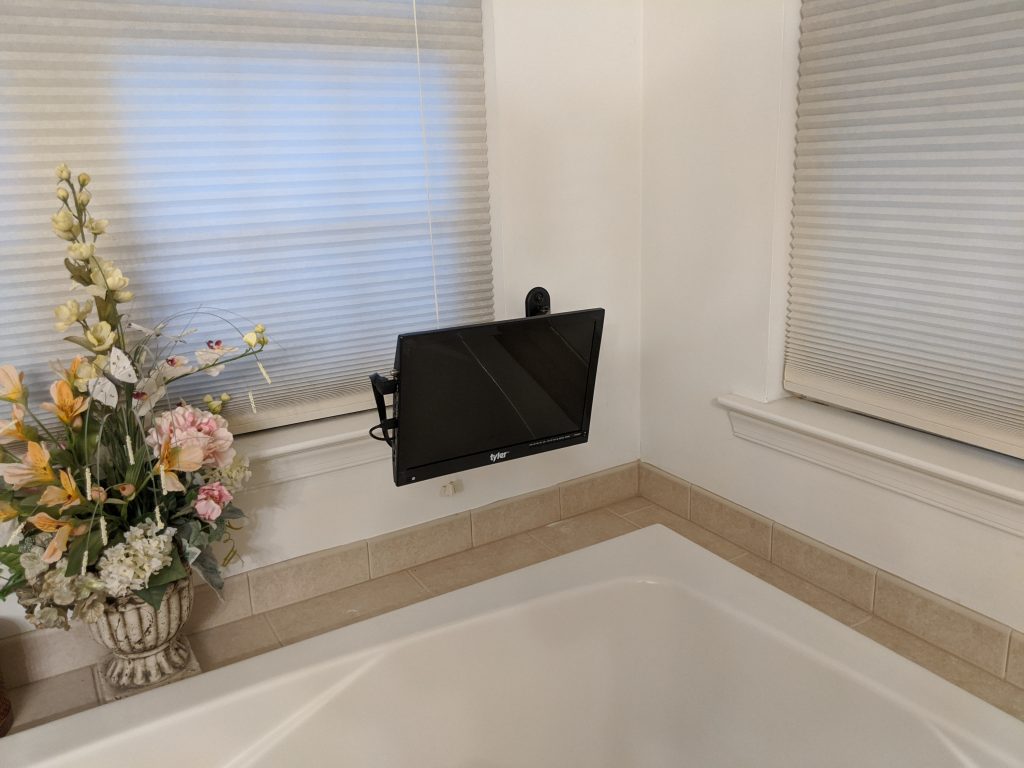
Since we can’t go on vacation during the pandemic, I wanted to make a spa experience for my wife so she can have a bit of a vacation at home. Part of that experience was to be able to relax in the tub while watching her favorite shows. Putting a TV near the tub is challenging for all sorts of reasons, but mainly because I don’t want AC mains power anywhere near the tub. So here was the solution I came up with:
Tyler TTV705-14 Battery-powered, VESA-mountable 14″ TV (eBay)
Mounting Dream full-motion wall-mount TV arm (amazon)
Floating water-activated bath candles (amazon) (for more spa effect)
The overall result was nice (and safe). The TV mounts to the quick release plate which mounts to the wall-mount arm, allowing the TV to be positioned at a good angle for viewing and swiveled back against the wall when not in use. The streaming stick (Roku or Amazon as you prefer) mounts on the back of the TV with industrial velcro and connects to the side of the TV to get power from the USB port and send video to the HDMI input.
I’d worried that 14″ would be too small, but it’s actually just right since you’re pretty close to it in the tub and the audio is quite good. The TV can receive over-the-air channels too if you connect an antenna, but we’re not in a great reception spot so the streaming solution works much better and there’s no unsightly antenna; it’s fully self-contained.
The quick-release VESA plate allows you to easily slide the TV off the wall-mount arm to recharge the battery when needed, but holds it securely in place otherwise. Overall, I’m happy with the solution!
Next steps:
1. Waterproof the remote. I haven’t found a waterproof case for these so I may end up using an amazon echo dot elsewhere in the bathroom to provide voice control…possibly the easiest tub-safe option.
2. Running 12vdc from the ceiling to the TV so it doesn’t need to be removed for charging. This would be a bigger project; using 12vdc keeps it safe (I still don’t want mains power anywhere near the tub), but our tub is in the corner of the house where it will be tough to fish a line to bring down 12vdc power from the attic. If DC power is there permanently, there’s no need for a battery-powered TV that must be charged periodically, so I might then replace it with a slightly larger LCD monitor.
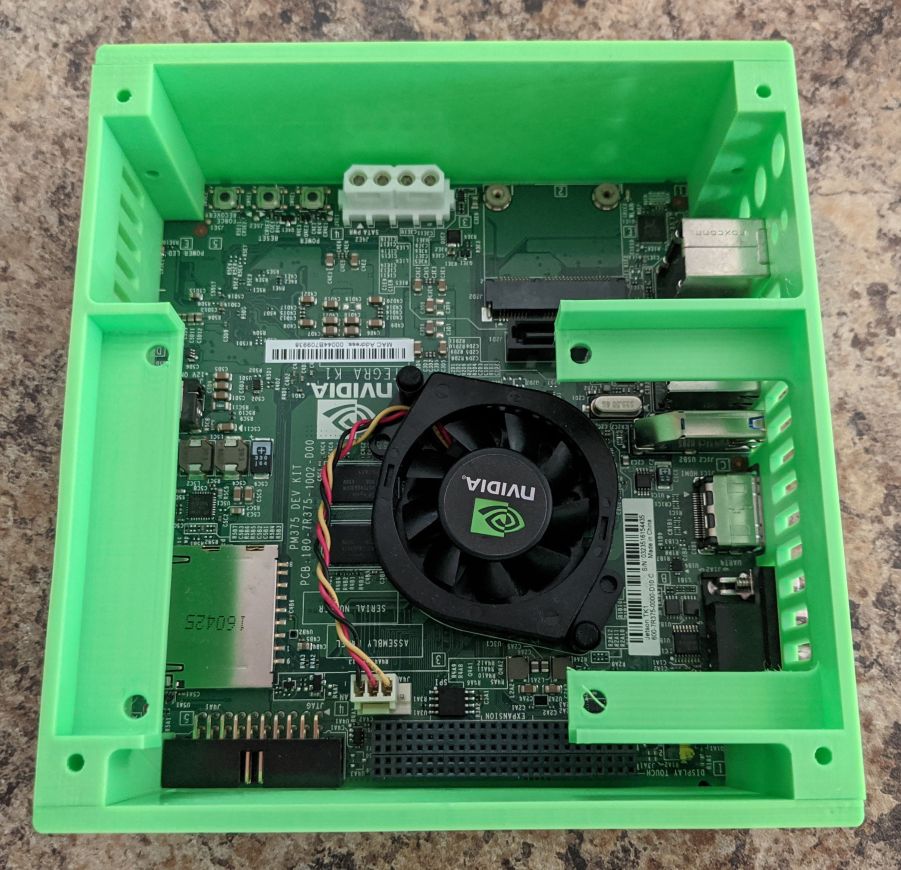
A company on eBay is auctioning off pieces of an old supercomputer cluster someone had built from Jetson TK1s and Intel NUCs. The boards are old, but you get a bunch of them pretty cheap so I bought one since SBCs are always handy for projects.
Jetson TK1 in 3D printed enclosure
The Jetsons are a nice platform for getting one’s feet wet with CUDA for vision and deep learning on a mobile (e.g. robotic) platform. The TK1 is outdated but a nice board with 2GB RAM and 16GB eMMC flash (11GB free) running Ubuntu 14.04 linux. Most importantly, the GPU is an nVidia Kepler GK20a with 192 CUDA cores providing up to 326 GFLOPs.
If you need more power, NVidia has newer boards such as the Jetson Nano ($99), TX1, TX2 ($400), Xavier ($400), and more. The newer boards are better (more memory, faster GPUs, etc.) and use the standard RPi GPIO connector to make hardware interfacing easier, but the TK1 is fine for learning.
Configure to boot from internal eMMC disk
The boards arrive configured for network booting (PXE) and you need to change that if you want to boot into ubuntu from the internal eMMC disk. To do that, you’ll need to connect to the serial port using a null modem cable or adapter and a USB-Serial cable/adapter. The unit starts out running u-boot; you can interact with it using a serial terminal ([https://www.chiark.greenend.org.uk/~sgtatham/putty/latest.html PuTTY], [https://ttssh2.osdn.jp/index.html.en TeraTerm], etc.) configured for 115kbps, 8 data bits, No parity, 1 stop bit. Reset the board and when prompted, press any key to stop the automatic boot within 3 seconds, then you’re at the u-boot prompt. You can change the boot target (default is pxe) using the following commands:
setenv boot_targets mmc0
saveenv
reset
Then when you boot, it will automatically launch ubuntu from the eMMC drive (mmc0) and you can interact with it using an HDMI monitor and USB keyboard/mouse. See here for more useful info on u-boot configuration. The default user name is ubuntu and the password is also ubuntu.
Install JetPack, reflash OS, install CUDA, OpenCV, etc.
Most users will want to use these units to experiment with CUDA-enabled code for vision processing (OpenCV) or machine learning (Tensorflow) on embedded platforms such as robots. nVidia’s tool for flashing Jetsons and loading 3rd party software is called “JetPack” and runs on a host PC running Ubuntu 14.04 linux. Fortunately, you can setup the host PC as a virtual machine (VM) running in any OS (I used Windows 10). The flashing process will require your host PC be connected to the Jetson using a common micro-USB cable and also the Jetson must be connected to the same LAN using an Ethernet cable.
Configure the VM optical drive (DVD) to use the downloaded .iso You’re going to install Ubuntu 14.04 onto the new VM’s drive from the virtual DVD
Configure the VM for bridged networking The Jetpack requires that the VM be on the same local area network as the Jetson.
Configure the VM for USB 3.0 support (Settings->USB) – requires Extension Pack This will make the USB connection used to flash the OS onto your Jetson both more reliable and much faster.
Boot the VM and install Ubuntu
Expand your VM desktop size to at least 1024×768 (1280×768 is better)
Run ifconfig in your VM and make sure eth0 has an address on your local network (it needs this so it can talk with the Jetson after it has flashed the OS)
In the VM, launch Firefox and download nVIdia JetPack 3.1 (you’ll need a free nVidia developer account)
Set the downloaded JetPack-L4T-linux-x64.run to have executable permissions
Launch a command shell and run the downloaded .run file (does not need sudo)
Follow directions: select TK1 as the target board, accept licenses, etc. Then when asked:
Connect your Jetson to Ethernet
Connect your Jetson to your PC via a micro USB cable
Connect your Jetson to 12V power
Configure your Jetson for Forced Recovery mode:
Hold down the Force Recovery button (closest to corner of board)
Press and release the reset (center) button
Wait 2 seconds and then release the Force Recovery button
In VirtualBox, under Devices->USB, select NVIDIA Corp APX (the Jetson) to allow the VM to have access to the Jetson via USB.
In your VM, run the command lsusb in a command window and make sure it shows a device named NVidia Corp. (if not, one of the above steps failed and you’ll need to try it again before proceeding)
If you’re going to use this VM again, you may find it useful to make it automatically capture the nVidia USB connection using VirtualBox USB Device Filters
The Post Installation step will take a long time; flashing the OS only takes ~10 minutes, but if you install and build all of the add-on software it will take more than an hour.
Note: much of the installation time is downloading and building the images for the Jetson. Once that’s been done once, you can launch the installer again and it will skip the unnecessary steps and you can jump ahead to flashing the OS and/or installing the applications. cd ~/JetPack ./JetPack-L4T-3.1-linux-x64.run
Note: if you ever want to just reflash the OS: cd ~/JetPack/TK1/Linux_for_Tegra_tk1 sudo ./flash.sh jetson-tk1 mmcblk0p1 (This may also provide an easy way to flash the OS onto a larger SD card: mmcblk1p1)
When all is done, the Jetpack is fully installed on your VM, your Jetson is flashed with a shiny new OS (well actually an old OS: Ubuntu 14.04), and the important tools have been installed on the Jetson: CUDA, OpenCV, cuBLAS, cuDNN, and Visionworks (which has some really nifty demos installed).
To work with graphics, connect a USB keyboard and mouse and an HDMI monitor. The Jetson GPU is capable of some impressive graphics processing at high frame rates. An Rpi couldn’t touch it.
Be sure to run the samples such as oceanFFT in NVIDIA_CUDA-6.5_Samples/bin and run the gameworks sample (~/run_gameworks_sample.sh). The VisionWorks demos are even more impressive. Go to /usr/share/visionworks/sources and run the command: ./install-samples.sh ~ which will copy the samples to your home directory/VisionWorks-1.4-samples. Then go to ~/VisionWorks-1.4-samples, type make to build the sample programs, and when the build finishes, go to the bin folder and run the samples.
You should now also be able to connect to your Jetson from a remote computer using ssh. You can get the Jetson’s IP address from the serial interface console using the command ifconfig or you can connect to it using its default hostname: tegra-ubuntu.
Remote Graphical Desktop (VNC)
For graphical remote access, consider setting up VNC. You can find instructions here.
VNC isn’t a secure protocol, but if your Jetson isn’t exposed to the internet, you can eliminate the need for the ssh tunnel and VNC directly to the machine. Just change the OPTIONS line in /etc/init.d/vncserver to remove -localhost.
Once VNC is installed, you can connect to the Jetson from a remote computer running VNC Viewer and use a graphical desktop. If you changed the OPTIONS line to remove -localhost, then you can login directly by VNC viewer connecting to host tegra-ubuntu:5901
If you left the OPTIONS line configured with -localhost, you’ll need to create an encrypted tunnel from your remote machine to the Jetson in order to access the VNC server:
Then VNC to localhost:5901 and login with password ubuntu
Some other tweaks you can consider to the xfce4 desktop accessed in VNC:
Fix the default terminal: Press Alt-F2 to launch a program Run xfce4-settings-manager Select Preferred Applications->Utilities->Terminal Emulator->Xfce Terminal
Fix tab-completion in command windows: Press the Applications Menu button (top left) Select Settings->Window Manager->Keyboard->Switch window for same application-> <clear>
Java
If you want to do some Java programming, you can install Oracle Java 8.
Go here and download the Linux ARM 32 Hard Float ABI version (you may need to sign in or create a free account with Oracle)
Make the directory to hold Java and extract it there:
sudo mkdir /usr/lib/jvm
cd /usr/lib/jvm
sudo tar -xzvf ~/jdk-8u261-linux-arm32-vfp-hflt.tar
Edit the file /etc/environment to add java to the search path and create the required Java environment variables. When you’re done the file should look like this: PATH="/usr/local/sbin:/usr/local/bin:/usr/sbin:/usr/bin:/sbin:/bin:/usr/games:/usr/local/games:/usr/lib/jvm/jdk1.8.0_261/bin:/usr/lib/jvm/jdk1.8.0_261/db/bin:/usr/lib/jvm/jdk1.8.0_261/jre/bin" J2SDKDIR="/usr/lib/jvm/jdk1.8.0_261" J2REDIR="/usr/lib/jvm/jdk1.8.0_261/jre" JAVA_HOME="/usr/lib/jvm/jdk1.8.0_261" DERBY_HOME="/usr/lib/jvm/jdk1.8.0_261/db"
Configure the newly installed Java as the default Java:
You can upgrade to 16.04 but I recommend sticking with 14.04; many tools won’t work well with 16.04 and if you’re not careful, the upgrade process can lose the special GPU drivers requiring you to reflash the jetson from scratch. I recommend turning off checking for version upgrades: Applications Menu->Settings->Software & Updates-> Updates Tab->change Notify me of a new Ubuntu version to Never.
NVidia has an active developer forum where you can find answers to almost anything. eLinux is another great reference plus loads of links. For information on the GPIO header see here and also the Jetduino project. Another great site is JetsonHacks. Other useful links:
UPDATE: although I still like the uCurrent and CurrentRanger, there’s a new king of the hill for current measurement here: the JouleScope. I’ll leave this post up because the uCurrent and CurrentRanger are much less expensive than JouleScope, but if you want best-in-class current measurement for IoT devices, JouleScope is clearly the way to go; I’ll post a detailed review soon.
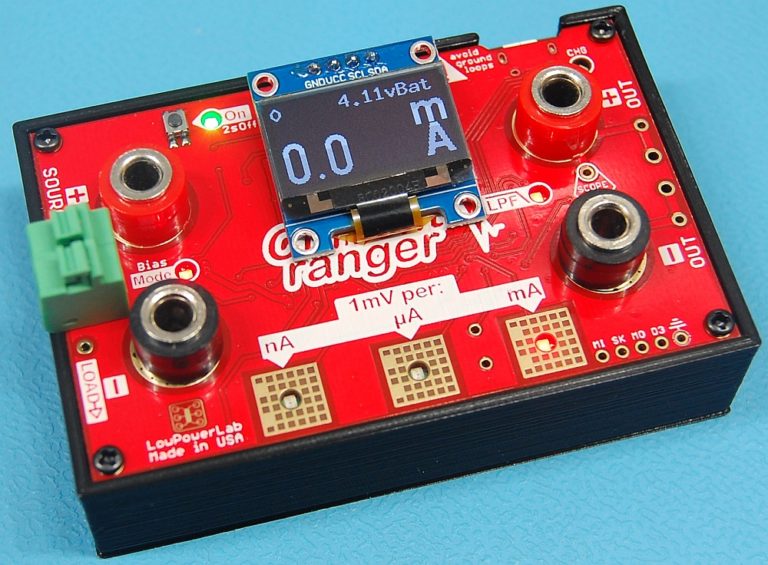
I’ve long relied on the uCurrent Gold to measure low currents (micro-amps, nano-amps) in the IoT devices I design, but it is no longer in production. So I recently purchased a CurrentRanger from Low Power Labs which offers the same ultra-low burden voltage measurement and adds several enhancements.
Current Ranger
Both devices use very low value current sense resistors to impose minimum burden voltage and use low noise, low offset gain stages to amplify the current into a proportional voltage that is presented on the output terminals and that you can measure with a multimeter. So, for example, if operating in the uA range, a 33uA current through the supply->load terminals will result in a 33mV output on the output terminals.
The CurrentRanger is improved over the uCurrent in several ways including:
Fast auto-ranging using an internal microcontroller allowing use of the device to monitor battery powered IoT devices which typically exhibit a very wide dynamic range of current consumption (often from nA or a few uA in sleep mode to hundreds of mA when transmitting).
An optional OLED display which provides a convenient way to monitor the current without having to connect a multimeter to the output terminals. (albeit limited by the ucontroller’s ADC input granularity and accuracy). This can save a lot of wiring clutter and bench space.
Powered by an internal rechargeable lithium polymer battery (that you must supply) which it can charge from the built-in micro-USB connector. This is handier than the coin cells that the uCurrent uses which tend to run out at inconvenient times and replacements aren’t always at hand. It can also be used with 3x AA batteries (you’ll need to supply the battery holder), but if so you must not have the batteries installed while the USB cable is connected (the USB connection powers the internal lithium battery charger which would damage AA cells).
Supports/suggests external data logging using a TTL serial interface or an optional HC-06 bluetooth module for electrically isolated data logging which also helps prevent cluttering your bench with more wires. The HC-06 is a class 2 bluetooth slave module that does transparent serial communications bridging. I’ll write another post regarding the HC-06 module, but you can see its datasheet here and buy them on amazon or AliExpress or eBay or a host of other sites (they are popular); there are also less expensive DX-BT18 modules (manual here) that claim to be compatible and supports BT4.2 including support for SPP and BLE. At least some versions are actually FCC certified (2ADMF-HC06 and 2AKS8DX-BT18)…I checked the FCC – which you should always do. There are many clones and compatible modules such as the JDY-08 (also here) and JDY-40 available for under $1 that are not FCC certified.
I tested the Current Ranger uA range with several precision resistors (100K, 470K, 1M) as fixed loads. The voltage output was spot on and the burden voltage was negligible. Compared with my much more expensive Advantest R6552 AC-powered bench meter, the Current Ranger offered slightly lower (better) burden voltage and slightly better accuracy. The only issue I noticed was that while the voltage output was spot-on, the OLED display read about 1uA too low across the uA range (i.e. it had a fixed offset, not a percentage error). This isn’t a big deal for me, but it’s worth noting. Overall I am quite pleased with the Current Ranger. The precision was excellent, it is well designed, very compact, and allows taking and logging current measurements across a wide dynamic consumption range, ideal for IoT devices.
I’ve been a fan of the STM32 micro-controllers for a long time and EmBitz by Gerard Zagema has been my preferred development environment. I am working on a project that needs a very low-cost microcontroller with fast PWM generation and the new STM32G0 family seems like a perfect fit with packages as small as SO8 and costs under $0.50 with a powerful 32-bit Cortex M0+ core and the same familiar peripheral set as their other uCs.
EmBitz is a light weight, lightning-fast IDE for C and C++ development; previously called Em::Blocks, it is a a fork of Code::Blocks that supports several micro-controller families including STM32 and integrates outstanding debug support. It is free,but I try to support such development and purchased a copy and recommend you do the same. The current version of EmBitz is 1.11; an impending 2.0 release has been announced but is not available yet.
EmBitz 1.11 doesn’t directly support the relatively new STM32G0 family, and many of the STM utilities don’t either (e.g. the latest STLinkUtility 4.5 doesn’t work with it). However, the EmBitz developer has already released an enhanced debugger that supports it and cleanly integrates with EmBitz 1.11. Here’s what I had to do to get STM32G0 development going under EmBitz:
Download and install EmBitz 1.11 (note that the site may be down if you can’t find a copy, email me for a copy)
Download the zip file (press the green Code button and select Download Zip) (NOTE: do not download the windows installer, it isn’t passing my virus checker)
Follow these instructions to install it in EmBitz. The instructions aren’t crystal clear:
unzip the EBlink-master.zip folder
copy the EBlink win32 folder contents into ${EMBITZ}\1.11\share\EBlink
copy the EBlink scripts folder into ${EMBITZ}\1.11\share\EBlink
Download the EBlink interface (v2.0) and extract it to ${EMBITZ}\share\EmBitz\debuggers\Interfaces\
Now, EBlink appears as a debug interface option under GDB Servers and you can use it to load software into your target and debug it in the IDE!
To create an STM32G0 project, I created an STM32L0 project (since it is also Cortex M0+) and replaced the template files with files I gathered (and somewhat modified) from other STMicroelectronics sources:
I have a lot of my personal data (photos, music, etc.) stored on a RAID1 array (two drives that mirror each other so that if one drive dies the other has all of the data). Having my data on a RAID array gave me a lot of confidence that the data was secure…until it died last week. The RAID controller bit the dust, one of the two drives died, and the partition table of the other drive was corrupted. I couldn’t access the data using any windows utilities or fdisk, gdisk, gparted or ddrescue. I realized I hadn’t backed that storage up in more than a year.
It was starting to look grim, when I read about testdisk and gave it a try…and it worked like a champ. testdisk recognized the damaged partition and and gave me access to the NTFS file system. I was able to copy the data onto a good drive so all is good (and I’m going to be a lot better about backups). Thanks testdisk!
Every now and then you need an electronic component and there just isn’t a good match available…necessity is the mother of invention so why not make your own? The problem was I had a very tight cost budget, very little PCB space, and was behind schedule…I needed a cheap, tiny solution FAST. Fortunately, I found the ATtiny which is an 8-bit AVR micro-controller available in packages as small as SOT23-6 package (about the size of the head of a pin) that costs $0.28 in small quantity and the more powerful ATTiny13A that costs $0.35 and is available in SOIC8 and DIP8.
I needed to generate a 5V PWM output to drive a MOSFET for programmable closed-loop control of the speed of two types of DC motors in a very tiny space. There aren’t that many *really* small micro-controllers in packages that are reasonable to prototype with (I hate prototyping with QFN and BGA packages). I considered a few including the Microchip PIC10F322 (also SOT23-6) and the STM8 series (supports the great STLink debug environment). I eventually counted out the PIC because the development environment was so unfriendly (I’m done with expensive proprietary compilers) and counted out the STM8 because even though I’m quite experienced with the STM32, getting the peripherals programmed properly can be complex and I needed a solution fast, so I chose the ATTiny.
I used avr-gcc as the C compiler which is fast, familiar, and generates tight code (you can’t go wrong with gcc). Microchip has breadboard-friendly DIP-8 versions of the ATtiny13A and the pin-compatible ATTiny25/45/85, so I could rapidly prototype a solution. The documentation is excellent, the peripheral set is rich and easy to use (unlike ST uCs which are incredibly flexible but accordingly complex). It was so easy that I was able to get the code fully functional in just a few hours having never use AVR processors before. I understand you can even use Arduino to program it (I didn’t).
Some notes on flashing tools. The Atmel-ICE is an awesome debugger that uses only the RESET line to do all of its debugging! Unfortunately it doesn’t supply power so it’s a lousy tool for flashing the target. I haven’t found the perfect tool yet, but the TinyAVR and USBasp (see links above) work well. The main down-sides are that they don’t have enclosures and getting them set up can be annoying; you need to install Zadig and reconfigure them to use libusb-win32 (see instructions here)…after that, they work well.
It’s not going to replace the STM32 family for most of my applications, and the STM8 series is arguably better, but for those times I need a really cheap, really small solution, the ATtiny is a nice addition to the toolbox. You can even order them from Digikey with your software pre-installed for an additional ~$0.25/chip making them truly a custom hardware component!
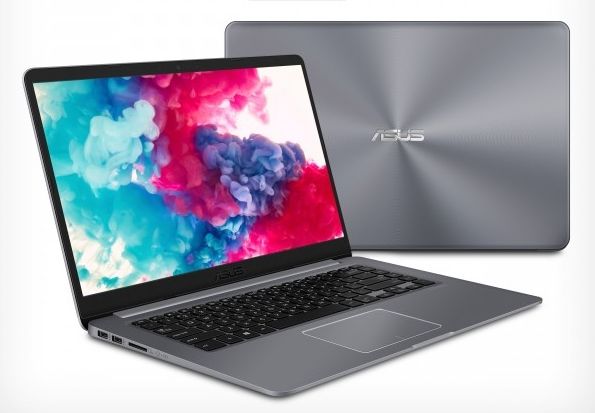
In my never ending quest for the perfect portable computing platform, I’ve come a step closer. There are loads of good ultrabooks, but most of them are *expensive*. I don’t want to carry/drop/lose a 1K+ device; my ideal portable is in the $300 range. Thus far, I’ve been using modified chromebooks, but some standard laptop/ultrabooks are finally getting into the right price range.
The Asus Vivobook F510UA-AH51 is replacing chromebooks running windows as my new carry laptop. It has an 8th-gen quad-core i5 processor, 15.6″ full-HD display, comes with 8GB DDR4 (supports up to 32GB), WiFi, USB 2,3,C, fingerprint reader, and HDMI. It weighs only 3.7lbs, is thin, has a very small charger, and looks decent.
The battery life is 6-7 hours which is a little less than I’d like, but the main compromise Asus made with this laptop was an old-fashioned, slow 1TB HDD that cripples its speed. Fortunately, you can add an M.2 SATA SSD and turn it into a speedy little laptop. I installed a Crucial MX500 M.2 SATA drive ($40 on amazon) which pleasantly came with Acronis True Image that allowed me to clone Windows from the 1TB HDD onto the M.2 SSD. The result is windows running on the SSD and the 1TB HDD available for bulk storage.
Installing the SSD requires opening the back of the machine (lots of screws including two hidden under two of the rubber feet); you’ll want a proper pry tool (or a guitar pick) to release the thin plastic clips that retain the back once the screws are removed. YouTube has many videos showing how to open the case; and since it’s a bit of a pain, I installed another 8GB of memory ($32 on amazon) while it was open.
The net result, while costing closer to $400 than my target $300 is a fast, light ultrabook with loads of storage and most modern features. A touchscreen and longer battery life would be nice, but not a big deal and overall, this is a great value and suitable for all student/business/development needs!


