
I finally caved and bought a 3D printer: the Cube 3 from 3D Systems and so far I’m pretty happy with it. See the manual here. The hardware is high quality, it’s easy to use, has dual-extruder jets, and looks pretty sharp. In some ways it is like an Apple product: a beautiful, but closed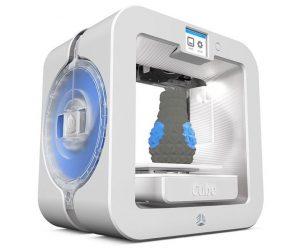 eco-system: the main down-sides are that it uses proprietary software and requires proprietary filament cartridges which cost more andsee update below are limited to PLA and ABS (the most popular material choices); other “cons” are that it isn’t fully enclosed and it doesn’t have a heated base which diminishes its performance with ABS and seems odd for a printer at the $1K price point.
I decided to get this for two reasons:
- I have an enclosure I need to prototype and I’m a beginner at 3D printing. I’d read about folks spending a lot of time getting their printers working in the first place and then keeping them working including constant parts replacements. The Cube 3 reviews indicate it is good for beginners and I want to focus on learning 3D mechanical design and printing instead of fighting with the tools.
- The Cube 3 has been discontinued and is available at fire-sale prices, sometimes under $200 shipped on eBay including two cartridges. That’s an amazing price for a well-made printer and unheard of for one with dual-extruders. At that price, it’s a no-brainer: if I start doing enough 3D printing for the cost of filament to become an issue, I’ll buy another printer and have gotten my money’s worth.
I’ve printed many objects in PLA which have come out nicely. PLA seems to be the go-to material for 3D printing; it is very strong but brittle, has good dimensional stability while printing (doesn’t shrink much as it cools), and has no smell when you print. I’ve also printed a couple of objects in ABS and they came out nicely although there was some mild warping at the base (because the platform is not heated). I printed a thin sheet of ABS too and it is remarkably flexible. There is a slight smell of melting plastic with ABS, but in my basement (big space) it was barely noticeable and certainly not a problem.
Overall, I’m very happy with the purchase and am enjoying 3D printing.
Update: After having used the printer for a while, I still think it is a marvelous piece of engineering, but there are some serious problems with the cartridges. I don’t mind paying more for the proprietary cartridges – I understand the 3D Systems business model, but after my 8th cartridge failed, I was no longer sympathetic. Since 3DSystems has discontinued these printers and abandoned the low-end/hobby market, they should really open the architecture so existing customers can make better use of them. Fortunately, I have found ways to overcome these issues and will share them below:
- Adjust the printer ‘z’ gap (the distance between the platform and the print nozzle) periodically. You do this from the front panel using a provided feeler strip; it doesn’t take long. You should adjust the gap until the feeler just barely slides beneath both nozzles with some friction between the platform and the lower nozzle. Having the gap a smidge too wide is better than too tight. If you are experiencing failure of filament to flow/jammed nozzles, the Z-gap being too small is almost certainly the problem.
- Don’t be afraid to repair or refill the cartridges. See how to do it here. The top cover snaps off; it takes a lot of force, but the cover doesn’t break; 3D Systems advises this in their Advanced Cartridge Reset Guide. Inside is a spool of filament with a clever latch to keep it from un-spooling when not mounted in the printer and a simple but effective feed mechanism. Filament passes between two gears that grip the sides and push it forward or backward. You can manually advance/withdraw the filament if it is broken using a Robertson (square) or Torx T20 screwdriver inserted into the feed mechanism drive (where the printer drives it). Note that you can only do this when the filament is broken (which happens sometimes); otherwise, keep in mind that the end of the filament is melted into the tip of the nozzle and if you try to withdraw it the filament will break and problems will ensue.
- Don’t be afraid to repair the nozzle. The nozzle is a two-piece snap-together assembly that can easily be opened by inserting a screwdriver in the crack near where the nozzle assembly starts and the feed tube stops and prying forward (away from the feed tube). You can repair a nozzle clogged with PLA by raising the temperature of the nozzle until the PLA softens and the nozzle tip slides off the tube; see here. Be careful not to pull too hard or you’ll break the plastic feed tube. If you have one, a hot air workstation (or perhaps a hairdryer) is a great way to heat the nozzle; if not, you can let it heat up in boiling water. If you do any work with modern electronics, you should have one of these. I set the hot air to 130-140C and heat the metal nozzle until it slides off the PTFE tube; I hold the nozzle with tweezers or needle nose pliers while it heats applying *very* gentle pressure; it should slide off the tube easily.
- There are firmware hacks that allow you to use non-proprietary filament; this works, but you use it at your own risk: see Cube Toolbox. A video showing how to use it is here if needed.
- I find the cartridges sufficiently unreliable that I no longer use them as intended; I remove the filament spool and put it on an external spool holder. I leave the cartridge cover off and feed the filament into the bottom of the extruder assembly and I hot-glue the portion of the PTFE sheath that fits into the cartridge edge so that it stays in place even with the cartridge open.
- Finally, filament absorbs water from the air and becomes brittle and problematic. This is not a problem specific to this printer, it affects all FDM printers. Once opened, filament needs to be stored in a sealed airtight container, preferably with some desiccant. To fix old filament, that has already absorbed moisture, I put the filament in a food dehydrator overnight at around 130F. When filament is not being used, I store it in a ziplock bag with a few desiccant packets which I then put in an airtight container such as an ammo box (available at Sams and Costco). For storing more filament, I use a bucket with screw-on cover and silica gel kitty litter for desiccant.
I haven’t yet tried it, but someone has made an enhanced feed mechanism for supporting other filament types; see here. There is an even simpler method that I intend to try here. that uses
If you want to refill a cartridge, there is a filament winder apparatus here with video showing its use here.
Some Cube 3 resources:
- Lots of good stuff on Print3DForum for the Cube3 including:
- ReCube
- Cube Toolbox (filament hack)
- Accessories you can print for the Cube3 on Thingverse
- http://cubifyfans.blogspot.com/
- A teardown/conversion project on OpenBuilds
- A Cube cartridge “refiller”: the ReCube