One of my main PCs is a Dell G5 5000. I bought it several years ago because it was relatively inexpensive, I’ve had good luck with Dell workstations, and it had the powerful (for the time) i7-10700F processor with 8 cores, 2.9GHz base, 4.8GHz turbo, and a fairly efficient 65W TDP.
Unfortunately, Dell cheaped-out with the CPU cooling, topping the CPU with a small “pancake” cooler that lets the CPU run so hot that it thermally throttles under load. I needed a better solution, but Dell’s case and motherboard design are proprietary and won’t accept popular 3rd party coolers such as the Pure Rock Slim 2.
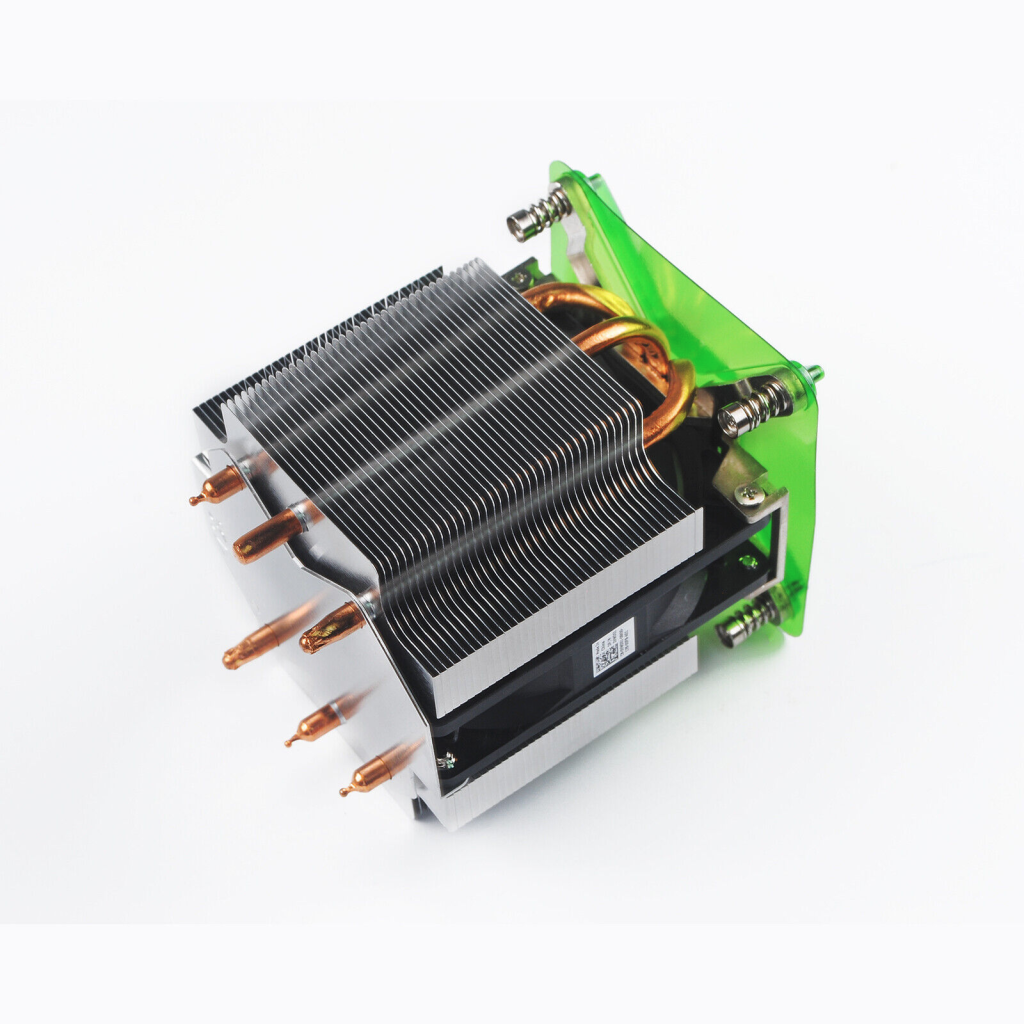
Dell VWD01 Heat Sink
Fortunately, Dell makes a much more effective cooler (part # VWD01) for the G5’s higher-end XPS cousin that fits the G5 and is a perfect drop-in replacement for the pancake cooler: unscrew the 4 screws at the corners of the pancake cooler, unplug the fan wire, remove the cooler, clean the old thermal paste off the CPU, and install the new cooler. The new cooler comes with a perfect layer of thermal paste pre-applied so you just line up the screws, plug in the fan, and screw it down. The corners of the heatsink have numbers (1,2,3,4); screw the screws down in that order and gradually (i.e. screw 1 down 1/2 way, then 2 down 1/2 way, then 3, then 4, then back to 1 to screw it down more…until the screws are tight).
The Dell VWD01 routinely sells new for around $25 on eBay which is less than half the price of most third party coolers. It is also the only upgrade I’m aware of that is a drop-in replacement for the custom Dell case/motherboard.
So how well does it work? With the old pancake cooler, my CPU idled around 45-50C and would quickly reach 95-100C (and then thermally throttle) if placed under load. With the new cooler, my CPU idles around 35-38C and even with all cores at max load, stays around 75C indefinitely; it never thermally throttles. At idle, the fan is silent; at max load you can hear it, but it is not loud. I monitor temperatures, clock frequencies, and core loads using OpenHardwareMonitor and put the CPU under stress using the Stress CPU feature of CPU-Z (I recommend both programs).
I upgraded my SDG1025 to the latest firmware (1.01.01.39R7) from Siglent (available here). It seems to have fixed an annoying issue: the need to select the language each time it started.
Of note: the update process is straightforward, but initially I tried it using a freshly formatted 32GB USB flash drive and although it recognized the drive, it did not see the .ads file on it. I tried it with a very old (128MB) flash drive and it saw all the files on that drive and the update process went smoothly.
If Siglent ever releases new firmware for the SDG1025, I hope they will consider moving the very useful frequency counter feature selection to the top menu level (which has room for another choice on the soft keys). Right now, it takes 4 button presses to get to it which is excessive.
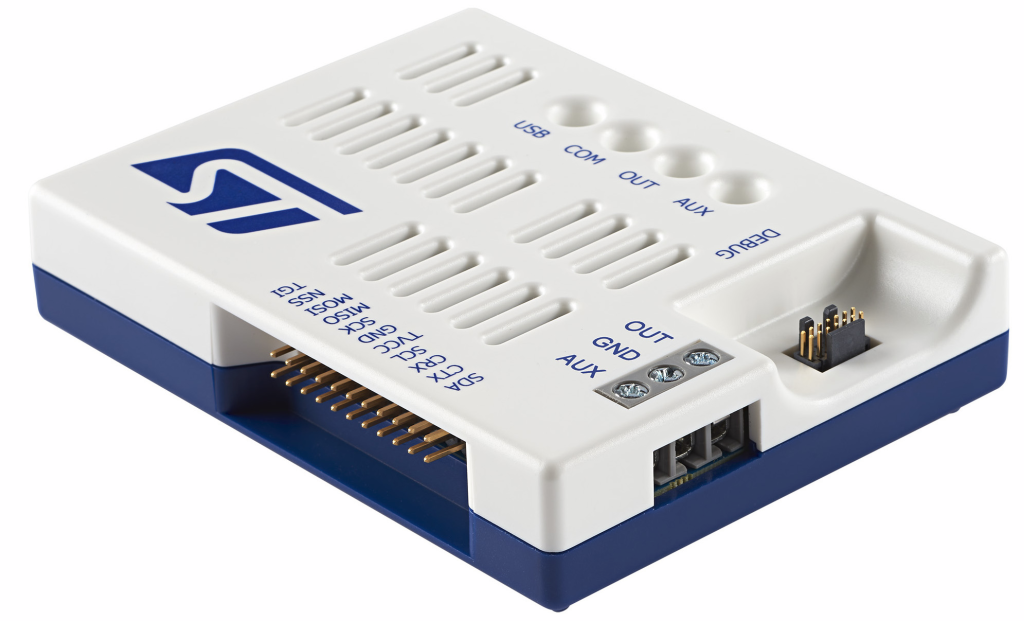
Update 2023-July: I no longer recommend using this until ST software support improves. At present, there are simply too many issues and it is a frustrating experience. The software seems somewhere between alpha and beta quality: the software that does work has major issues and many important software applications (including from ST) don’t work with it at all (including openocd which works fine with other STLink V3s).
I do a lot of design and development work using STM32 microcontrollers. The low-cost STLinkV2 hardware debug tool is part of what has made these processors so successful: the ability to quickly, inexpensively, and easily flash and debug firmware is a big deal. ST has gone a long way to make life easy for developers and we love them for it!
I have boxes of STLink V2s and clones; I use them all the time. Recently, I’ve started migrating to the STLink V3 and this post covers their most expensive variant: the STLINK V3-PWR which integrates some interesting features including:
SWD debug tool (flashing, debugging target)
USB-to-serial converter
variable power source for target (1v6 to 3v6 in 100mV steps)
dynamic current monitoring (100nA to 500mA) with 100ksps (50kHz BW)
It has additional hardware capabilities (SPI, I2C, GPIO, JTAG) that I haven’t tried yet (and it’s not clear that software support for them is ready).
Key Strengths
The STLink v3 is fast for flash/debug – even faster than the V2 (which was plenty fast)
The integrated serial interface works perfectly and saves another plug
Nice injection molded enclosure
The variable power source lets me test devices at voltages other than 3v3 and 5v which is more useful than it sounds…it’s often important to understand how the DUT will operate at 1v8.
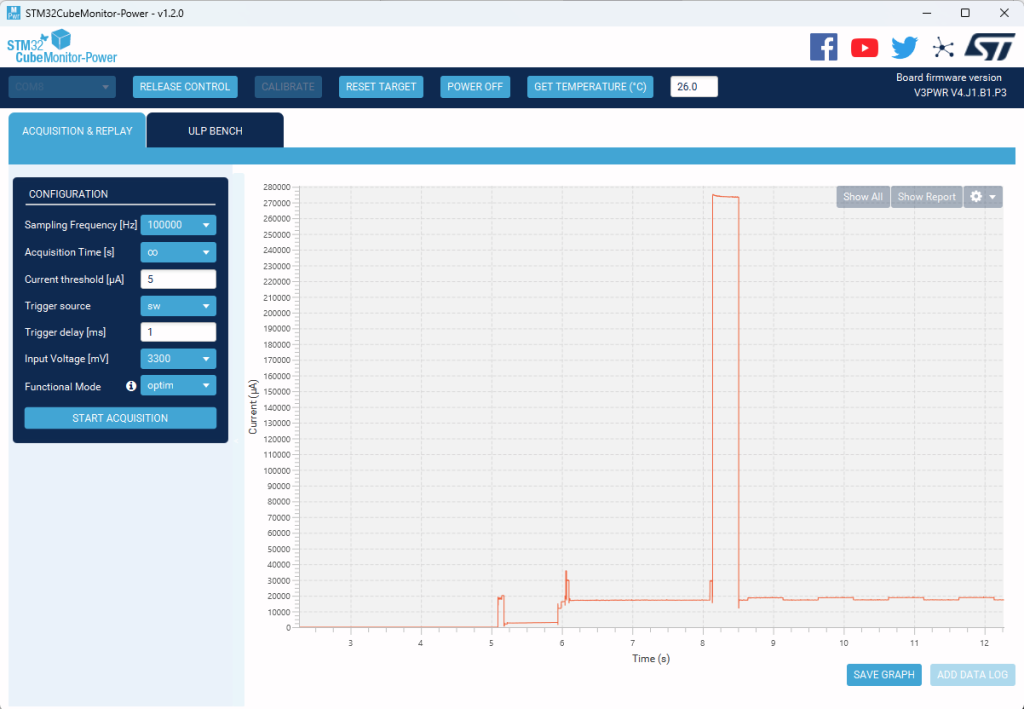
The ability to monitor dynamic power consumption during development is incredibly useful. I didn’t fully understand this until I started using a Joulescope and realized how much added visibility it provided. I now routinely develop with the DUT powered through a Joulescope so I can better “see” what’s happening. The V3-PWR dynamically switches between 4 current ranges to provide a huge dynamic measurement range without imposing excessive burden voltage.
Cost:
$95 is crazy expensive for an STLink and serial dongle (V2 clones and serial dongles are individually available for as little as $2 from AliExpress in nice compact aluminum shells).
$95 is crazy cheap for a dynamic power monitor that covers a wide enough current range for IoT development is hard to come by for even a fraction of the price. The Joulescope, is roughly 10x the price (but much more powerful).
If ST make the design public as they did with the V2, we can expect to see the price decline dramatically once Chinese clones appear.
Hardware Limitations:
100ksps (50kHz claimed BW) sounds great, but in reality, that sample rate doesn’t provide enough resolution to understand the dynamic power consumption of many IoT devices. It’s super-common for battery-powered devices to wake briefly (uSeconds), do something, and go back to sleep. This is one of the major differences with the Joulescope (2Msps, 300kHz BW).
No pass-through current/power monitoring. Batteries have higher impedance than most line-powered supplies and that impedance varies with temperature and other dynamic feactors (e.g. passivation). The V3-PWR lets you observe the consumption of the DUT, but not its dynamic interaction with a battery. (another difference with the Joulescope).
Power to the DUT is via ~3.5mm screw terminals…not banana jacks, not pluggable screw terminals, not even lever terminals…this was the wrong place to save a few cents.
Connection to the computer *requires* USB-C or the rare USB-A port that supports both data and charging. Maybe this isn’t a big deal or even a limitation, but it’s worth being aware of.
That Dang STC14 connector
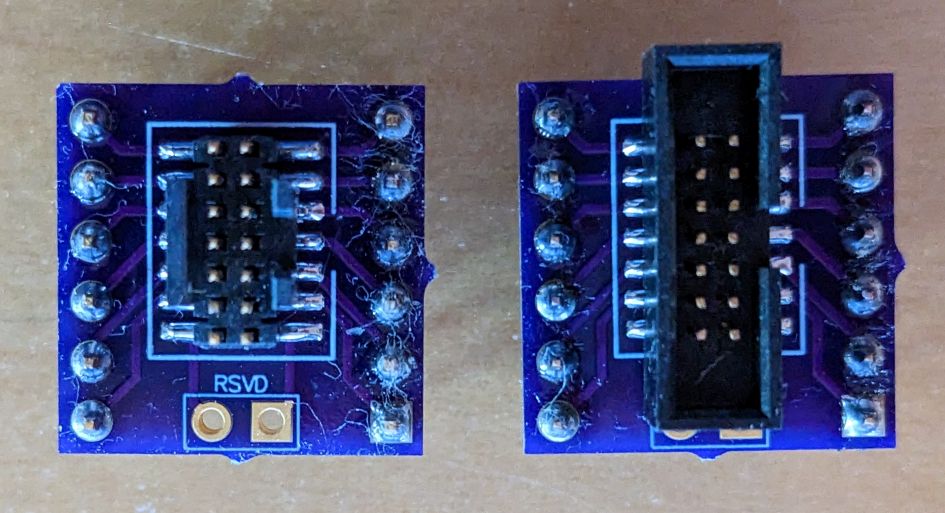
The biggest DOH! with the entire STLinkV3 series is ST’s adoption of a 50-mil “STDC14″ connector. 0.050” (1.27mm) connectors are simply awful, particularly for developers. Many targets won’t have the same STDC14 connector and now you can’t use the ubiquitous 100-mil dupont jumpers as we did with STLinkV2. Instead, you need a breakout board to adapt the 0.050 pins to 0.100. You can get inexpensive STDC14 breakout boards from OSHPark (9 PCBs for $11.10 shipped) and mount either these nice but very expensive and somewhat fragile Samtec connectors (left) or these much cheaper and more rugged CNC Tech connectors (right).
No cumulative or average power measurement. This is a huge deal for battery-powered devices (and one that ST can and should add to their software). Understanding average power consumption is key for most battery-powered IoT devices. The sampling limitation might limit accuracy, but this is an easy-to-implement and important missing feature.
The UI is limited (something ST will also hopefully improve over time). It provides a graphical display of current measurement (see below), but is missing features we’ve come to expect from scope-type equipment such as: horizontal or vertical cursors to make and document precise measurements, automatic axis scaling, adjusting the time-base dynamically, etc. ST software developers would be smart to license Joulescope software for the V3-PWR.
When the software associated with the V3-PWR matures, it will get a thumbs up from me. If/when cheaper clones start appearing, I’ll probably have a box of these to replace my STLink V2s. If ST provides an API, these could also form a very useful building block in many factory test fixtures.
Competitors
Nordic Power Profiler Kit 2 (PPK2) – similar price, wider voltage/current ranges, can measure external current sources (i.e. battery), but no debug/serial functions and no enclosure.
NXP MCU Link Pro – half the cost, but you must select one of two current measurement ranges using a jumper and neither of those ranges fully cover my measurement needs. Within the selected range, the MCULink dynamically switches between 2 sub-ranges, allowing good dynamic range, but not on the level of the other devices. It also has more limited power supply capabilities (two fixed voltages: 1v8, 3v3) and has no enclosure.
Disk Abuse
I left the monitor running overnight at a high sample rate with acquisition time set to infinite. It turns out that this writes a ton of data to the disk and by morning it had chewed through 160GB of disk space! Even worse, it’s not obvious where the disk space went! So for other users who find this issue, the power acquisition log files are in Users/myUserName/AppData/Local/Temp/Power_Monitor/Acquisition.
ST could significantly improve the software application (STM32CubeMonitor-Power) by adding a few features, some of which seem quite easy:
Checkbox to En/Disable logging (off by default) so you can watch power consumption as you develop/test.
Link to the acquisition logs folder so users can find it easily
Stop/play button so you can pause acquisition to measure an event and then resume
Cumulative power usage counter (so you can confirm expected average power consumption over a long test)
Cursors (current and time) so you can measure and document events
Auto-scale of the Y-axis should adjust to mA when appropriate. A scale from 0..500000uA is just silly and it’s surprisingly annoying to try to distinguish 15000 from 150000.
We all know things are ugly out there, but things are particularly ugly in the growing world of connected devices where security is often an afterthought or under-powered for the modern internet.
I was reminded of this yesterday when I needed to recover the root password for an internet device (with the permission of the device’s owner who had forgotten it…so it was legit to hack). Like many such devices, it used a scaled-down older linux kernel, BusyBox, and an old-fashioned /etc/passwd file where salted passwords are stored md5-crypt hashed. (format: $1$<salt>$<128-bithash>.
Fortunately (but also worrying), a popular hacking tool (John the Ripper) makes short easy work of such files. And when I say “easy”, I mean ridiculously easy and when I say “short”, I mean weak passwords are cracked in seconds. If you have access to the passwd file (let’s call it passwd.txt) you would just run the command “john passwd.txt” and in a few minutes, voila: out pop the decrypted passwords. You can enhance JtR with (big) lists of common passwords; there are free lists here and you can also buy lists. You can run JtR on a multi-core machine with a word list using a command like:
john –fork=8 –wordlist=mywordlist.txt filetocrack.txt
In the past, I wouldn’t make a post like this for fear of encouraging hacking, but these days, that fear is misplaced. Tools like JtR (and many much more powerful) are so easy to use and so widely available that *any* hacker at any level knows about them. So rather than keeping head in sand, it’s time to bite the bullet and start assessing (and fixing) your products’ security.
Hire someone to help with security if:
your system stores plaintext passwords
your passwords aren’t salted before hashing
you don’t have a delay before re-entering the password after a few failed attempts
If your products run on small/old linux kernels and/or otherwise use md5crypt for password hashing, consider upgrading and hash passwords using at least SHA256.
Prompt users when they are entering new passwords for what makes a quality password: use an obscure phrase rather than single words or a word with some numbers or some variation on their username.
Store usernames and passwords separately such that only the root user has access to the password file (/etc/passwd and /etc/shadow)
Check new passwords against known lists of pwnd passwords and warn the user.
Run tools like JtR against your own passwd stores and if it quickly guesses your passwords, know that hackers will be doing the same thing.
If possible, don’t use passwords at all on internet-facing systems; use public key certificates instead.
In your own (home/business) networks, segregate insecure devices (i.e. nearly every internet-enabled appliance: cameras, TV streamers, doorbells, etc.) from your computers and storage systems. Devices belong on the guest network or separate VLANs…not on your main WiFi/LAN.
Don’t use the same passwords in internet appliances that you use for things you care about. Assume the internet devices have been cracked. The security in internet appliances is usually *vastly* worse and when hackers crack that doorbell/camera, you don’t want that giving them access to the rest of your network, bank account, etc.
Ideally, use a different, good password for every account. Use a free tool like PasswordSafe to keep your passwords secure; encrypt the safe where your passwords are stored with a single very good password that you don’t use anywhere else and then you can store it on the cloud (OneDrive, GoogleDrive, whatever) so you have easy access to your passwords, but hackers don’t.
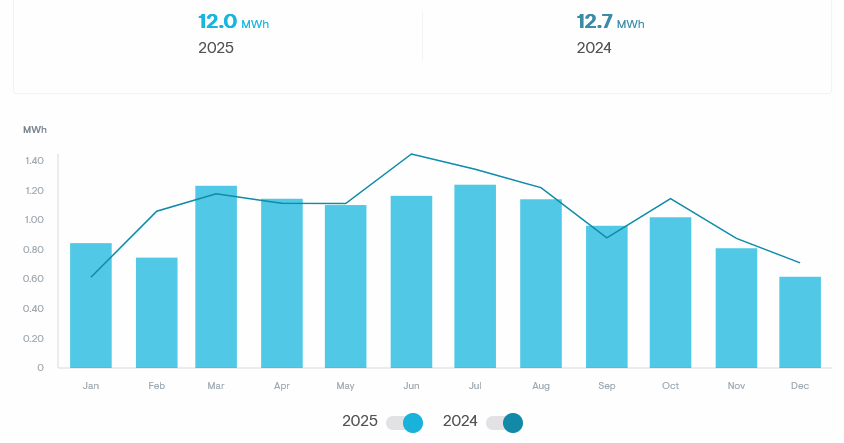
In 2025, the array produced 12.0MWh and I used all of it again (it’s clear that will be the case going forward). The weighted average of my 2025 BGE electricity rates was $0.209566/kWh so that’s a saving of $2514.79. I also received solar generation credits (SREC) of $576 for a total return for 2025 of $3090.79 which is not bad as an annualized 16% return on a 19K investment!
Update 2/16/2025
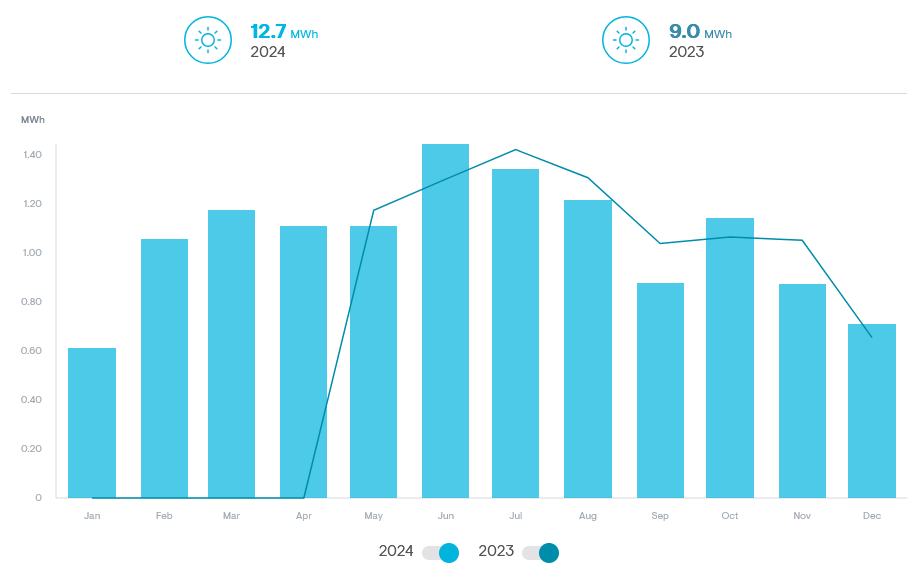
In 2024, The array produced 12.7MWh and I used all of it. My average 2024 BGE electricity rates were $0.17116/kWh, so that’s the equivalent of $2173.77 in savings. Allowing for inflation, that means the system is right on target for its annual energy cost savings!
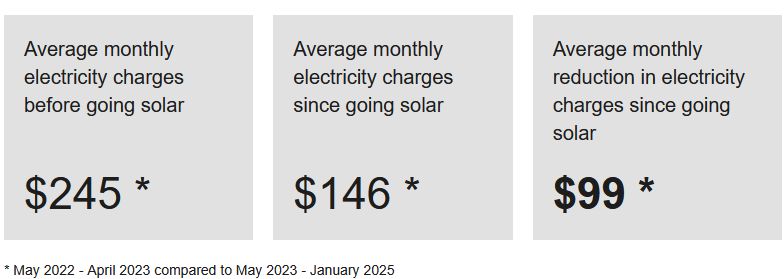
Interestingly, according to BGE’s dashboard, this past year, I’ve spent $99/month less for electricity than before I added rooftop solar; that’s technically true, but it’s also very misleading. Electricity today costs $0.18355/kWh rather than the $0.143/kWh I had first calculated and the $0.151515 it cost in March 2023 and $0.17116 in 2024. So electricity costs have been escalating steadily and the BGE data presentation hides their more than 20% increase in prices over 2 years.
For example, my March 2022, 2023 bills (before solar) compared to 2024 (after solar) showed a roughly 884kWh reduction in BGE power used which would have cost $151.31 in March 2024 (and even more today). So the solar savings are actually much greater than implied by the BGE dashboard.
Update 6/4/2024
The array has been up for a year so it’s finally time to look at annual production. The system produced 12.868MWh over the last 12 months; that’s less than the 14.7MWh the vendor expected and the 15MWh the government calculators predicted. It’s hard to know exactly why; it was an unusually rainy winter and I have a large river birch in front of the house that has grown to shade several of the panels. I could have it trimmed to increase production, but shading the house also reduces energy consumption so it’s hard to know exactly what to do.
I was also disappointed that the first 6 months of SRECs seem to have vanished into thin air. Even though the system was running for the last 6 months of 2023, the SREC exchange stated that that they would start selling my SRECs in 2024 which begs the question: what happened to the SRECs from 2023! Nevertheless, we received a check for the expected amount for the first quarter of 2024 and hopefully will from now on.
Re-working the numbers using an average 12.5MWh, since panel output is expected to decline over time. 12500kWh/yr x $0.155/kWh = $1937.50/yr. This means that return on investment should happen in roughly 7.62 years. Only slightly longer than the 7.4 initially estimated, but not far off and if the panels really last for 25+ years, they are still a good safe investment as well as being good for the environment. Overall, I’d do it again.
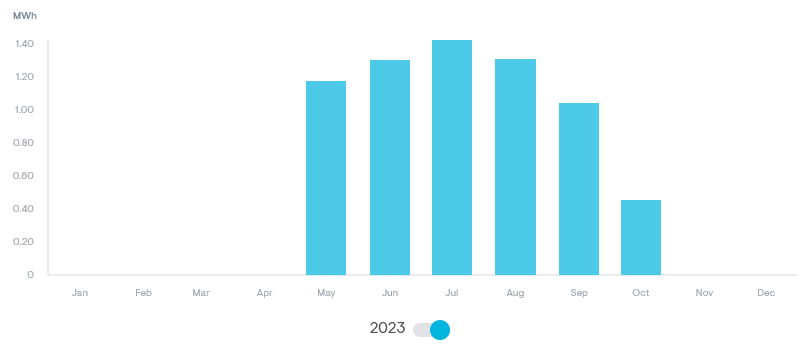
Update 10/12/2023
It’s been an odd summer with extended periods of attenuated sunlight due to huge Canadian wildfires and more summer rain than usual, so I don’t know if this is going to be representative, but total energy production for the first four full months: June, July, August, Sep was 5 MWh which is a little less than I’d expected.
I don’t know whether the system will reach the 14.7MWh annual estimate provided by the vendor this year, but it seems unlikely because it would need to produce 9.7MWh over the next 8 months or nearly 1.2MWh/month which seems doubtful given winter’s shorter days. I’ll update again periodically until there is a full year of production history.
Production as of Oct 12, 2023. Note, May was a partial month as the system was being installed.
As expected, energy production tops out around 7.8KW based on 27 x 290W inverters = 7830W those peaks rarely happen and when they do, are brief, so the selection of 290W inverters seems correct. This means that the “10.8kW” system really is a 7.8kW (peak) system.
Update 5/27/2023
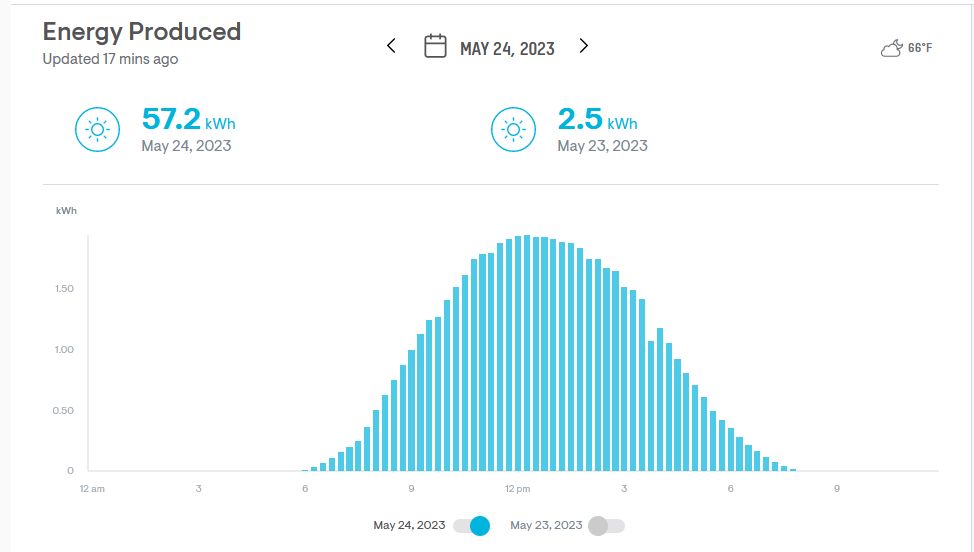
I switched the system on Tuesday evening and Wednesday was the first day of solar production. The system produced 57.2kWh. As expected, the system clips at nearly 8kW, but it was a sunny day and the system produced more than expected!
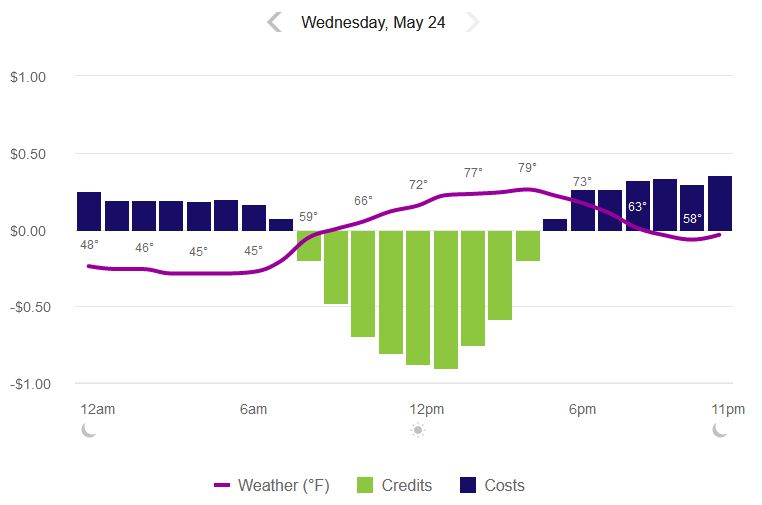
My utility company lets you see hourly consumption and production thanks to smart net metering; it lags a couple of days, but my energy bill went from $7 the day before to -$2.14 on Wednesday:
I’m looking forward to lower electricity bills and will post a detailed analysis of the costs vs. credits after I’ve gathered a few weeks of data.
Original Post
I’ve been waiting for years to install rooftop solar panels. In the past, the math simply didn’t work: the panels might barely pay for themselves over their lifetime: a poor investment. However, costs have come down and it finally makes sense.
The specifics are complicated and in this post, I’ll try to cover the factors that went into my decision and the resources I used. First, I did not want to lease panels; entering into a 25-year consumer contract seems undesirable for a host of reasons including that I don’t know if I’ll be in this house for 25 years and don’t want to incur the cost of moving panels or making the sale of the house contingent on a buyer having to take over the lease (that might not make sense for them). So I will be purchasing the equipment outright. For folks who can’t, I suggest using a home equity loan (which will have a much lower interest rate) rather than borrowing from a solar vendor or leasing.
Q-Cells Q.PEAK DUO ML-G10+
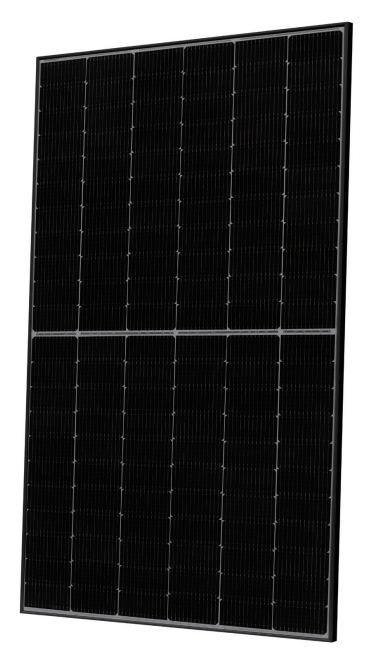
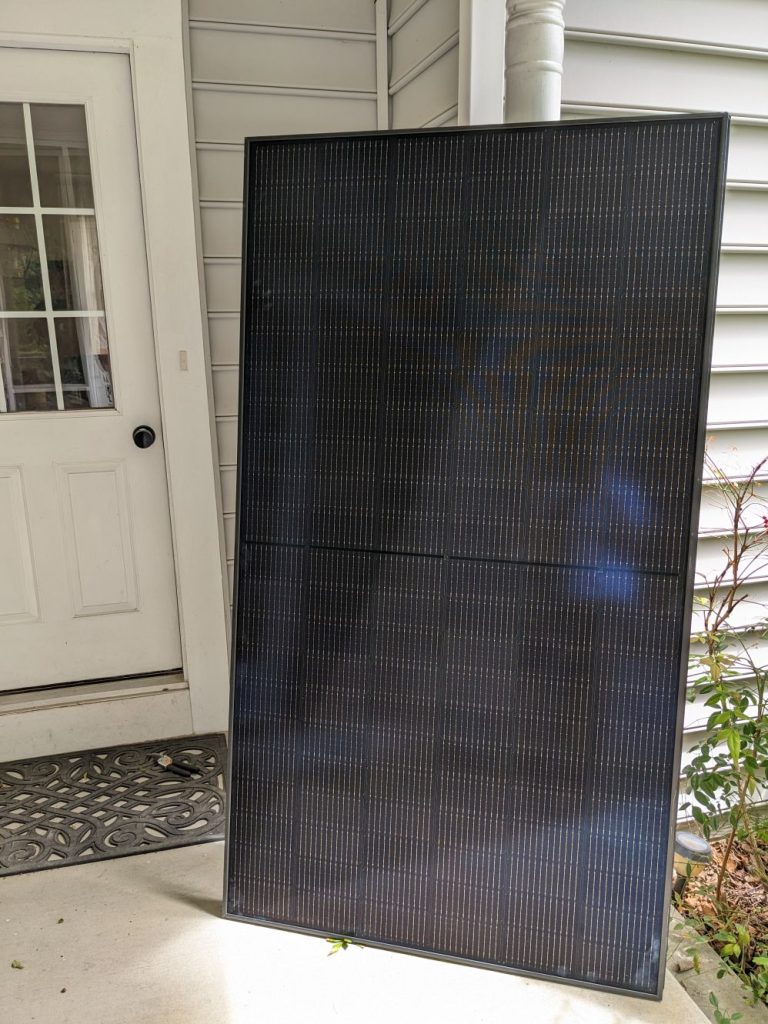
Panels: I’m going with Q-Cells panels (Q.Peak Duo BLK ML-G10+) which are 400W panels that seem to strike the right balance between cost, warranty (25 years) and efficiency (20.4%). EnergySage (a great resource) rates them as excellent and resilient against snow/wind/hail/fire. They have a linear output decline warranty and so should still be delivering 86% of their rated power after 25 years. Q-Cells is a South Korean company and Tesla uses Q-Cells panels so there’s a reasonable chance they will be around in 25 years if I have a warranty claim. If you were buying them on the open market, these panels cost about $326 each. We’ll be getting 27 of these ($8.8K) to produce up to 10.8kW (more on production later).
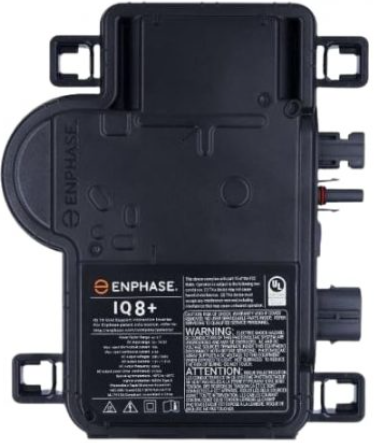
Inverters: EnphaseIQ8+ microinverters were recommended by the company we’ve chosen for installation. These are also rated as excellent by EnergySage and also have a 25 year warranty. One microinverter is used for each panel (i.e. 27 microinverters for 27 panels).
The jobs of a microniverter include:
Enphase IQ8+
Maximum Power-Point Tracking (MPPT): draw power from each panel at a rate that maximizes the panel’s output and thereby extracts as much power as possible from the sun hitting each panel at a given time and ambient temperature. Having one device per panel allows optimizing power for the individual conditions of each panel (e.g. when some are in shade/under-snow/whatever).
Convert the roughly 36VDC panel output to 120VAC which is what is used in your home’s wiring.
Communicate with each other and with monitoring equipment over the 120VAC household wiring using power-line-carrier (PLC) communications (so no extra wiring is needed).
Shut down power production if the power from the main electric grid (the power company) fails so that they don’t back-feed power into the grid which could endanger line crews working to restore power on lines they expect to be powered off. (More on this later too).
The IQ8+ inverters offer high (97.7% peak) efficiency and can provide up to 300W peak, or 290W continuous output power. But “wait” you say: if the panels can produce up to 400W, why use inverters that can only provide 290W continuous output power? The answer is that the 400W panel rating is a little bogus. Panel maximum output ratings are under ideal lighting conditions (1000W/m^2) that generally won’t happen unless you are on the equator at noon. Under the more realistic NMOT lighting conditions (800W/m^2), the 400W (max) panels will produce about 300W. There are also losses in the wiring from the panels to the inverter, and 2-3% loss within the inverter due to conversion inefficiency, so 290W rated continuous output power inverters are actually a good match for the “400W” panels. IQ8+ microinverters retail for $189 each and can be had for $167 each. We’ll be getting 27 of these so around $5.1K total.
Production: the installer estimates 14,726kWh produced in the first year; this will decline 2% after the first year and then gradually over the 25-year life of the equipment until it is 86% of the initial production. They estimated the production ratio for our roof at 1.36. This matches pretty closely with the NREL (government) solar calculator that estimates 15,050kWh/year. Production is much higher in Mar-Oct than in Nov-Feb, but that’s also when we use much more electricity (for A/C). Another great site for estimating what your house can produce is Project Sunroof.
Return-on-Investment: so how does this all work out? The financial case for the panels is complicated and built on several factors, some of which will change over time:
Initial system cost: $28.6K
Energy that you produce and use. This directly offsets energy you would otherwise buy from your local utility. In my case, that power costs about $0.143/kWh. So every kWh the panels produce and I use saves me $0.143.
Excess production. Production that is in excess of what is used (unlikely in my case) can be sold back to the utility at wholesale rates (around $0.05/kWh) through a process called “net-metering”. I’m going to assume none of this.
Solar Renewable Energy Credits (SRECs) – Utilities are required to increase production of energy via renewable sources. One way they can meet this energy requirement is by getting credit for your production. So you can sell these credits on an open market and receive a payment for each MWh you produce. EnergySage explains it better here. Since it’s an open competitive market, the rate being paid for SRECs will vary by location and over time. You can check local SREC rates at SRECTrade here. In my case, in Maryland, the value of each SREC is worth about $59/year; these will decline over time (see estimated values here). A 10.8K system generates about 12 SRECs/year.
Tax Credits: Currently, there is a 30% federal tax credit for solar installations and Maryland offers another $1K credit.
Energy inflation vs. other safe investment returns. – I could put the money I’d spend on panels into another investment of comparable risk (very low) and it would generate revenue. OTOH, energy costs are subject to inflation and so I’m going to call this a wash and ignore it.
So let’s do the math:
28.6K up-front for the system includes the materials (panels, inverters, combiner, mounting system) which I estimate cost around $17.5K. I’d guess around $5K for labor and permits, leaving room for about $6K profit for the installation company (which is very little on that size purchase). The company (Revolution Solar) is a family business owned by a neighbor so they’re giving us a break on pricing; my entire experience with Revolution Solar has been fantastic and it’s not just me, they are very well reviewed on EnergySage. I highly recommend them.
There’s a 30% Federal Investment Tax Credit (FITC) which returns $8580 and a $1K state tax credit which brings my cost down to $19K.
Production declines over time so let’s use a 14MWh/year estimate and assume that we use all of the power produced: 14000*0.143=$2002/year energy savings.
SRECs also decline in value over time; over the next 8 years, we can assume an average of $47/month or $564/year * 7.5 years = $4230
So: $19K – $4230 SRECs = $14,770 we need to recover in energy savings
$14770 divided by $2002 energy savings/yr ~= 7.4 years
This is good enough. ROI might push out past 7.5 years if we don’t use all the power that’s produced, but we are pretty heavy consumers of electricity and given that electric vehicles are likely in everyone’s future, that’s unlikely to change. Fusion will eventually come online and drive electricity costs down, but that’s not likely in the next 20 years and in the interim, solar provides some protection against increases in energy prices, should provide a nice return in years 8-25, and we can be a little greener to leave the world a better place for our kids.
Update 5/2/2023
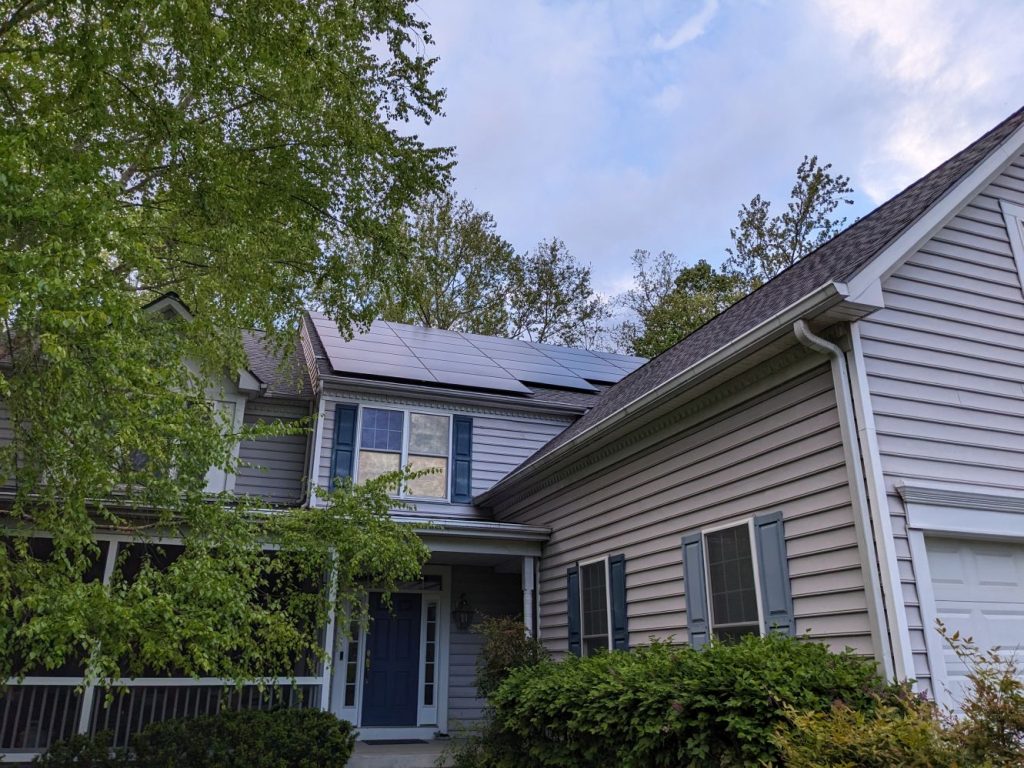
The panels are installed and we’re waiting for the final inspection and approval. We had to replace our roof as part of the process because it was 20 years old and would otherwise need to be replaced a few years after installation which would incur the cost of removal/re-installation that would make it much harder to cost-in. The solar company (Revolution Solar) did a fantastic job on both the roof replacement and the panel installation. They worked quickly and efficiently, cleaned up well, and gave us favorable pricing. I was particularly taken by the extra effort to do things like hide the electrical conduit which they even painted two colors to match our siding and trim, and they placed the external connection boxes behind hedges so they’re well hidden. The panels themselves are black with black trim and are therefore fairly unobtrusive against the shingles.
I was surprised by how large the panels are:
Emergency Backup Power: my only disappointment with the Enphase system is that they don’t have a cost effective solution for providing emergency power during a grid power outage. When an outage is detected, the inverters shut down so even though there are panels on the roof producing power, you can’t use it. The backup solution Enphase offers for $7-8K is nicely automated, but that’s just too costly given how rarely we have an extended outage (we haven’t had one in more than a decade) and the comparatively low cost of gas emergency generators.
The problem is driven in part by the fact that the solar tie-in is on the line-side of the breaker panel which precludes using the panel itself to disconnect the photovoltaics from the grid. It seems like a better design would be to connect the PV circuits into breakers on the load side of the breaker panel and replace the main breaker with a PLC-enabled smart-breaker that signals the inverters to resume production when the main breaker is opened. This would protect linesmen from backfeed, let homeowners select and power critical circuits (fridge, freezer, sump pump, etc.) using their existing breakers for a few hours a day during multi-day outages. It wouldn’t be pretty, but it would do what’s needed and shouldn’t cost anywhere near $7K. I realize there may be code or other things that preclude this. It would need to be apparent to the homeowner that to completely cut power to the loads would then require throwing both the main breaker and the solar panel load-side breakers. Hopefully, as solar becomes more common, panel makers (Square-D, Eaton, etc.) will start producing smart panels designed to support solar generation.
Idea: 2025: I think there’s a lower cost (~$550) solution for emergency power that seems good enough for me and is enough nicer-to-use than a portable gas generator that I’d prefer it for many things. The critical thing during extended power outages is to be able to run your fridge and freezer for at least an hour or two a day so the food doesn’t spoil (assuming you don’t open the fridge) and also to keep things like phones and laptops charged. The fridge is the thing that will consume significant power.
Sure, I can power my fridge with a gas generator, but that means setting up the generator outside (and it weighs around 50lbs), running a long extension cable to the fridge, storing gas, and periodically refilling the generator. Storing the generator after use is also a pain. Many generators are pretty noisy too. Instead, there are now many relatively low cost power banks such as the Anker Solix C1000 that can be placed on a counter next to the fridge and plug the fridge directly into it (much easier).
The C1000 lists for $499 but is frequently on sale for $449. Enphase sells a similar power bank, but it’s significantly pricier. It’s stores 1kWh of power and you can buy an expansion battery to double that. It can supply up to 1800W of power which is enough to power almost anything in your house (for a while). The base (1kWh) unit stores enough energy to power my fridge for 3-5 hours and keep phones and laptops charged. It is silent, safely used indoors, weighs under 30lbs (so you can move it around reasonably easily), and doesn’t require (much) maintenance.
The question is: how do you recharge it during an extended outage. With the gas generator, I can keep a few gallons of gas in my garage and run it for days. However the power station batteries need electrical power to recharge. It can be recharged from AC power (if one of your friends or neighbors has power or from your gas generator), or 12VDC from your car, OR from a solar panel…like the ones on the roof! The latter is particularly interesting because it will work over a really extended power outage and is most convenient.
So I think a good budget solution (if you’re willing to install the conduit and cable yourself) is:
Pair of MC4 Y-adapters between a rooftop panels and its micro-inverter (i.e. to allow using the panel for charging when the inverter is off due to a power outage) ($11)
M+F MC4 crimp connectors to connect a wire run to the Y-adapter, ($5 or less)
1/2″ EMT conduit, straps, elbows to protect the wire from the panel to the entry point into your house ($25)
Pair of 25′ 10AWG or 12 AWG THHN wire ($0.87/ft or less x 25 x 2 = $43.50)
DC electrical wall outlet inside house (still thinking about this)
You can then use the rooftop solar panel to charge your power station since it’s not doing anything else during a power outage. This isn’t nearly as elegant as the solutions Enphase offers, but it should be significantly less expensive (especially if installed at the same time as the panels) and provides at least some emergency electrical power during extended power outages.
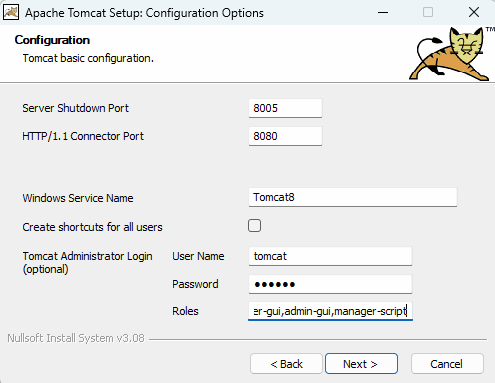
Getting Tomcat 8.5 to work with Netbeans 16 on Windows is maddeningly difficult in large part because the windows service installer for Tomcat doesn’t set the defaults that Netbeans needs.
If you’re on this page, it’s because you’ve been frustrated with it too. The magic formula to install tomcat correctly seems to be: 1. Set the server shutdown port to the default expected by Netbeans (8005) not the default (-1) 2. Add a Tomcat Administrator (e.g. user name=Tomcat password=Tomcat 3. Add manager-script to the Roles
I haven’t updated my 3D printing page for a while so this page has my latest thoughts on the subject:
These days, I mainly print using FDM on a Diggro Alpha-3 printer (bought on amazon). It is one of the zillion Creality Ender-alikes with some nice features (particularly the touchscreen control panel and end-of-filament detection). It produces high quality prints (about 10mil accuracy). See the Alpha-3 sub-reddit here.
Diggro Alpha-3
I’m partial to Monoprice PLA+ filament these days. It mixes some TPU into the PLA to produce very nice, very reliable results (see various filaments and their characteristics here). I use a 50C bed, 205C nozzle, and no cooling fan. I print directly on glass with Aquanet Super Extra Hold hair spray for adhesion (cheap, effective, smells nice).
If filament has been out for more than a few days, I still dry it in a food dehydrator (which works really well). I store it in a 5-gallon bucket with silica-gel kitty litter at the bottom and a screw top that seals the bucket but makes it easy to open.
Good prints require the bed be leveled and the nozzle properly gapped; I use a post-it note for the gap width.
When folks need a small embedded linux machine for control applications, a Raspberry Pi is usually the first thought. I’ve made good use of Raspberry Pi Zeros and 3Bs but have been reluctant to adopt the RPi 4 due to the apparent need for active cooling, high power consumption, very poor availability, and high pricing (it makes little sense to use an RPi when you could use a much more powerful x86-family platform).
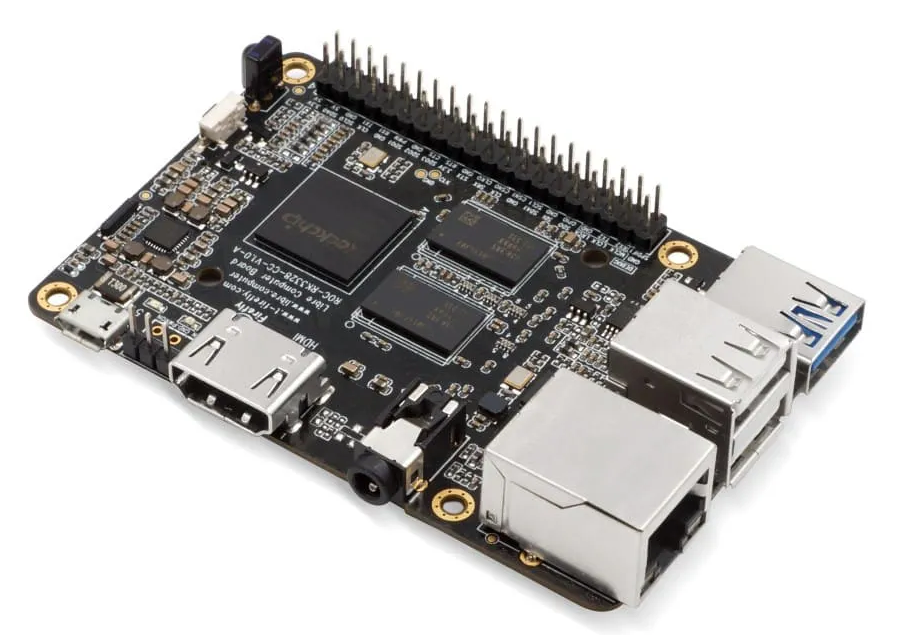
With RPis out of stock for months and being scalped everywhere, I decided to try a Libre Computer ROC-RK3328-CC which is footprint/form factor compatible with the Raspberry Pi and can run Ubuntu, Raspberry Pi OS, Armbian, Debian, Android, and many other OS. The docs are here. The board comes in two versions: 2GB for $45 and 4GB for $55 – those prices are with free one-day shipping via amazon prime and they are available immediately. I bought the 4GB version which is 4x the memory of an RPi 3B+; the memory is also DDR4 vs. the DDR3 used on the Pi. The board is easily passively cooled; I bought the custom heat sink ($10) although any similarly sized heatsink should work fine.
Update 2025: the heatsink is now included for the same $55 price-point and there is now also a $65 option that includes a wifi and bluetooth dongle (see amazon)
I tried Ubuntu desktop but was disappointed by the bloat and installed Raspberry Pi OS (a Debian derivative) instead and am very happy with it; I installed the desktop (not lite) version. The board is DIN-rail mounted using this high-quality mounting solution. It runs several minicom sessions monitoring/logging other embedded boards as well as a Postgres database and Java backend data collection application. Even over TightVNC, it feels snappy and doesn’t break a sweat (stays between 45 and 47C); it is using less than 1/4 of the available RAM (but would have used nearly all of the RAM on an RPi3).
Update 2025: I returned to using ubuntu server…because it’s ubuntu. Note that the Libre pre-installed distribution has an obsolete signature for Libre’s custom repository (which you need). So before you can apt update; apt upgrade, you need to do this:
Other upsides: 4K video (mainly of value for HTPC applications) and USB 3.0 – much more important because it makes it worthwhile to connect an external SSD which will be much faster and more reliable than uSD storage. The main downsides relative to the Raspberry Pi are: no WiFi/Bluetooth and no Pi-compatible camera connector. I didn’t need those for my application (which is rack-mounted and connected to Ethernet), but if you need either, you can easily solve them via USB connection.
For storage, I use Sandisk Extreme uSD cards. 64GB costs $11 and is plenty of storage for my application (I’m only using 6%); if I need more, storage or speed, I’ll use an external M.2 card connected via USB 3.0. Note: there is a huge difference in performance and reliability between SD storage cards used in RPi applications; some cards won’t work at all, some will work but at half the speed of others (see this performance comparison). I’ve tried a bunch and settled on the Sandisk Extreme which offer good speed with a cost only slightly higher than lesser cards; the benchmarks bear this out. If I were doing something more disk-intensive, I’d consider either a board with a native M.2 interface (like the Odroid M1) or an x86 board with a native SATA or M.2 interface. Update 2025: I’ve switched to eMMC for storage; see post here.
Note: uSD cards aren’t meant for frequent writing (as in linux logs), so if you want your card to last, I strongly recommend using a utility like log2ram that creates a small RAM disk for the /var/log partition (you can add others) and then periodically flushes that partition to SD storage. This will dramatically lengthen the life of your SD card; see here for more info.
Cyber security is a growing problem and the rapid growth of IoT is only making things worse. Many homes are now inundated with “connected” devices, many of which are vastly less secure than your typical home PC (which itself is fairly insecure). Connected devices usually have much smaller and less capable microprocessors, making it harder to implement robust security mechanisms. Their software also receives far less scrutiny than the software in popular operating systems and they typically receive software updates infrequently. With so many devices online these days, from thermostats to cameras to appliances to streaming sticks, it’s just a matter of time before those are hacked and if those devices are on the same network as your computers and document/photo storage, all of those are at increased risk.
One strategy to help lower risk is to create separate networks in your home for the devices containing sensitive data (taxes, family photos, documents, etc.) and for your internet-enabled devices. For example, you might have separate networks for:
Home computers and storage
Printers
Guests
Streaming devices (e.g. Amazon Fire Sticks and Fire ReCast or TiVos or …) that need to communicate with each other and the internet
IoT devices (cameras, appliances, thermostats, etc.) that only need to communicate with the internet.
There are two main ways networks are formed these days: wired (Ethernet) and wireless (WiFi). Most modern WiFi access points let you create a separate isolated guest network that has its own ssid and where the firewall rules allow each host on the network only to access the internet; they can’t access each other or your home network. Providing separation and isolation for your wired network is a little more complex.
The easiest way to do separate your wired devices is to put them on separate networks connected by a router. You can create separate networks by physically wiring them separately, with each network only connected to the router, but that’s often inconvenient; you may have a streaming device and a computer in the same room and you don’t want to run two wires. Another approach is to use intelligent Ethernet switches that support a feature called Virtual LANs (VLANs).
WIth VLANs, you create separate networks by assigning each network a number and then controlling which network(s) each port on your switch participates in (they can participate in more than one). Lots of companies make intelligent (aka managed) switches including Netgear and Ubiquiti. Netgear offers an inexpensive line of semi-intelligent GbE switches that support VLANs called ProSafe Plus. These can often be had on eBay for $20. Ubiquiti makes a more feature-rich line of switches, part of their UniFi series and their 5-port Flex Mini switch is a strikingly good value if you buy a 4-pack (around $29/switch…unheard of for a fully managed switch).
With NetGear switches, you *must* update the firmware to the latest version before using it; older firmware versions have serious security vulnerabilities. You configure the switch using its web interface. Under VLAN, select 802.1Q, then Advanced. Under VLAN Configuration, enter a unique VLAN ID for each network you want to create. VLAN 1 is the default network. Then under VLAN Membership, select which ports on the switch belong to which VLANs. Ports can be configured as Tagged or Untagged. Select Tagged (‘T’) for the ports that go from your switch back to the router (or another switch). Select Untagged (‘U’ for the ports that go to a computer/device/appliance. The Tagged port that goes back to your router should be a member of every VLAN. The Untagged ports that go to your devices should typically be members of only one VLAN. Finally, under Port VID, set the Tagged trunk port to use a PVID of 1 (main network) and then change each port that participates in a dedicated LAN to the number of its VLAN.
Consider an example: a 5-port switch (NetGear GS105eV2) is connected as follows:
Trunk port (uplink to the router) – Tagged, member of VLANs 1,2,3
PC you want on your main network – Untagged, Member of VLAN 1, PVID=1
Streaming device – Untagged, member of VLAN 2, PVID=2
DVR – Untagged, member of VLAN 2, PVID=2
IoT device 1 (e.g. IP Camera) – Untagged, member of VLAN 3, PVID=3
The streaming device and DVR are both on VLAN 2 so they can communicate with each other as well as accessing the internet through the router. The IoT device is on VLAN 3 so it can only access the internet through the router; it cannot access the Streaming devices or the PC. This is important because if the IoT device is hacked, the hacker has not gained access to your home network.
The switch connects to a router (possibly going through other switches). The router must be configured to do the following:
Create a network for each VLAN. For example VLAN1=192.168.1.0/24 VLAN2=192.168.2.0/24 VLAN3=192.168.3.0/24
A DHCP server should be configured for each VLAN
If the router contains a switch, create a virtual interface for each VLAN on the switch
Create firewall rules that determine how traffic can flow into, out of, and between each LAN (usually just into and between/local). For example, VLAN1 should not allow incoming traffic from the internet unless it is in response to traffic that originated on VLAN1. VLANs 2, 3 should only allow incoming traffic from VLAN1 or in response to traffic that originated on VLAN2 or VLAN 3 respectively.
If you run a server at home, it’s best to put it on its own VLAN and create firewall rules that only allow incoming traffic from VLAN1. Then use port forwarding on the firewall/router to bypass the firewall rules for specific TCP ports (e.g. 80, 443).
If your network is large, document it using yEd or similar.
I am a long time Eagle (electronics CAD) user and decided it was finally time to learn solid modeling for mechanical design. Learning any CAD package is a huge time commitment so even though I already subscribe to Fusion360 from AutoDesk, I value my time and want to invest it wisely so I researched several options. The choices came down to Fusion360 and Alibre Design. Alibre costs more and lacks some of the standard F360 features, but it is available for purchase rather than subscription which I find very appealing for reasons I’ll outline below.
What clinched the deal was my support interactions with the two companies. In the case of AutoDesk, I wanted to know if I could use their discounted CyberMonday pricing to renew my F360 license or if it was only for new customers. Their ‘no’ response took days and confirmed my fear about AutoDesk’s subscription model: it creates incentive to take existing customers for granted and focus only on new sales…more on that later.
By contrast, when I reached out to Alibre regarding some concerns with their licensing model, I heard back within a few hours (on a holiday Sunday!); first from a senior support person, a few hours later, their CEO responded to my question in their online forum, and the next day, I heard from their COO who worked out a creative licensing solution at no additional charge. Mighty impressive. Needless to say, I purchased the top tier Alibre Design package and don’t expect to renew my F360 subscription.
These customer service experiences echoed the experience I’ve had with Eagle CAD since AutoDesk acquired it. I purchased Eagle many years ago when it was owned by CadSoft. They released periodic updates and I bought them if and when they added value. AutoDesk bought Eagle 5 years ago, switched it to a subscription-only model, and integrated it with their new 3D modeling software: Fusion 360. In the intervening 5 years, Eagle hasn’t improved in any ways I care about; if anything, their push to move it into the cloud has made it slow and clunky. Glitzy but rarely used features help sales more than the routine features used daily by real existing users, but with the subscription model, vendors have little incentive to take care of existing customers…a great reason to avoid the subscription model.
I’ll post a review of Alibre Design once I’ve had some time to learn the basics, but if their technical quality is anything like their customer service focus, I expect great things.
Update Jan 2023: I really like Alibre Design. It’s easy to learn and use and is quite powerful. The YouTube tutorial videos are very good and now that I’m learning AD, I can see why everyone I know who does modelling tells me that the skills are easily transferable between programs: the concepts are what really matter and most of the tools (AD, SW, F360) implement them in similar ways.